Home > Installings Roman Chrome Plated Shower


Installation Instructions for Roman Chrome Plated Multi-Color LED Rainfall Shower Set

Roman Chrome Plated Multi-Color LED Rainfall Shower Set

Roman Rainfall Shower Setis available in Chrome finish, the recessed Multi-Color LED Shower Head features rainfall, a Hand Shower, Body Massage Jets, Triple Handle Valve. Body Material is Stainless Steel that gives you an excellent bathing experience.

Roman Shower Set Specifications

  • Type : Rainfall Shower Set
  • Style : Contemporary
  • Surface Finish : Chrome
  • Installation Type : Recessed
  • Surface Treatment : Polished
  • Material : Stainless Steel
  • Shape : Square
  • LED: Water Powered LED Lights
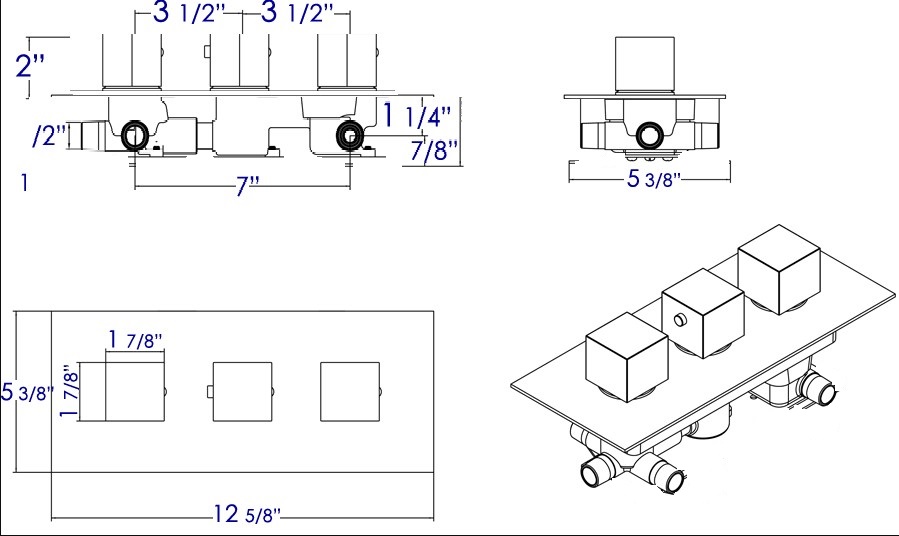
  • Size : (14.17"*19.68"*2.75") 36cm*50cm*7cm
  • Feature : Hold & Cold
  • Number of Handles : Triple Handles
  • Waterflow : 7-9 L/Min
  • Water Pressure : 0.25-0.5 MPA
  • Function 1 : LED Rain Shower
  • Function 2 : Massage Shower Body Jet
  • Function 3 : Handheld Shower
Roman Chrome Plated Multi-Color LED Rainfall Shower Set

Package Includes

  • 1 304 SUS Led Shower head
  • 1 Brass hand shower + SS Shower Hose + Brass Shower Holder
  • 1 Brass Shower Mixer
  • 6 Shower Body Jets 2 inch
BathSelect® Manufacturer Warranty Information

  • Before you begin, please read the installation instructions below. Observe all local building and safety codes.
  • Unpack and inspect the product for any shipping damages. If you find damages, do not install.
  • Please note all showers must be installed by a professional and certified plumber otherwise warranty might be voided


1. Attach the upper wall support to the shower wall using a drill and the mounting hardware provided. Use a level to ensure that the shower riser is perfectly straight.
2. Place thread sealant on the ½” pipe threads on the shower wall and thread on the mounting nuts. Allow the sealant to cure for 24 hours before use.
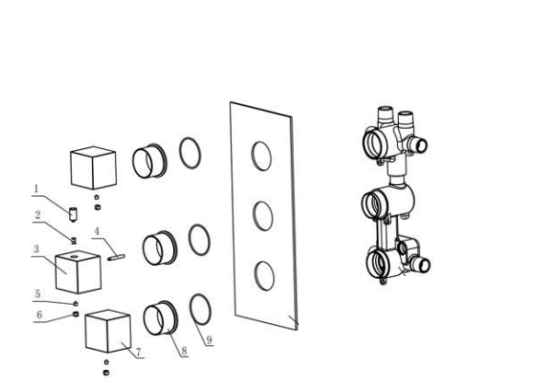
3. Attach the hot and cold valve bodies and decorative escutcheons (if included) directly to the pipe threads. Tighten with an adjustable wrench to secure.
4. To install a hand-held shower, mount the cradle at a suitable height for the user with the hardware provided. Attach the hose to the faucet with any rubber washers or sealing gaskets included. If your system does not feature a hand-held shower move on to the next step.
5. Attach the showerhead to the top of the riser and tighten with a smooth jaw wrench. Do not tighten more than ¼ turn beyond hand tight.
6. Turn on the water supply and open the faucet valves. Check for any leaks and verify that the hot and cold supplies are working correctly. Let the water flow through the riser pipe and shower hose for approximately 30 seconds to clear out debris and dirt.
Note: If leakage occurs, tighten connections with your adjustable wrench as necessary. If problems persist, contact Customer Service.

According to the dimensions and shape of the mounting bracket, determine the bracket location to be installed in the ceiling.

Showerhead lists :
  • Showerhead
  • 11.8" shower hose
  • Tee joint
  • Expansion bolt
  • G1/2" filter net
  • H4 inner hexagon


Attention

1. Open packages, check all the goods whether everything is ok.

2. Check the size of the connector and the thread size of the water pipes connector in the wall.

3. Clean the water pipes before installing them.

4. At least 2 water electricians to install the showerhead.

5. Pay attention to the water temperature, not over 70 degrees.

6. Water pressure: 0.05 MPA - 0.5 MPA.

7. Adapter is 100-265 V to 12 V, insurance device rated current less than 30 MA.


According to the four mounting holes on the mounting bracket, use Electric drill play mounting holes.
a) Through the two hexagonal nuts adjust the distance between the mounting bracket and the ceiling, and keep the mounting bracket on the level.
b) Use explosion screw fixed mounting bracket on the ceiling, pay attention to the explosion screw can adjust the height, and use level adjust the mounting bracket to level.


Connect 1 pcs water hose to 1 Tee Joints and G1/2, G1/2 joint in the middle, then put another side of the shower hose through the hole of shower head size.


Install the decorative panel, use SW4 hexagon wrench tighten 4 screws.


Hand-Held Shower Instructions


5. Hole Locations For Wall Mount
Remove Front Cover (5A) from Wall Mount (5B). Use Wall Mount Screw Holes (5C) to place the desired location. Using a punch or awl, tap the screw hole locations. Holes must be vertically aligned.

7. Wall Mount Installation
Place Wall Mount (7A) into wall and inset Mounting Screws (7B) through Wall Mount Holes (7C) and tighten until Wall Mount (7A) is flush with the wall. Do Not Over Tighten! Insert Front Cover (7D) into Wall Mount (7A).


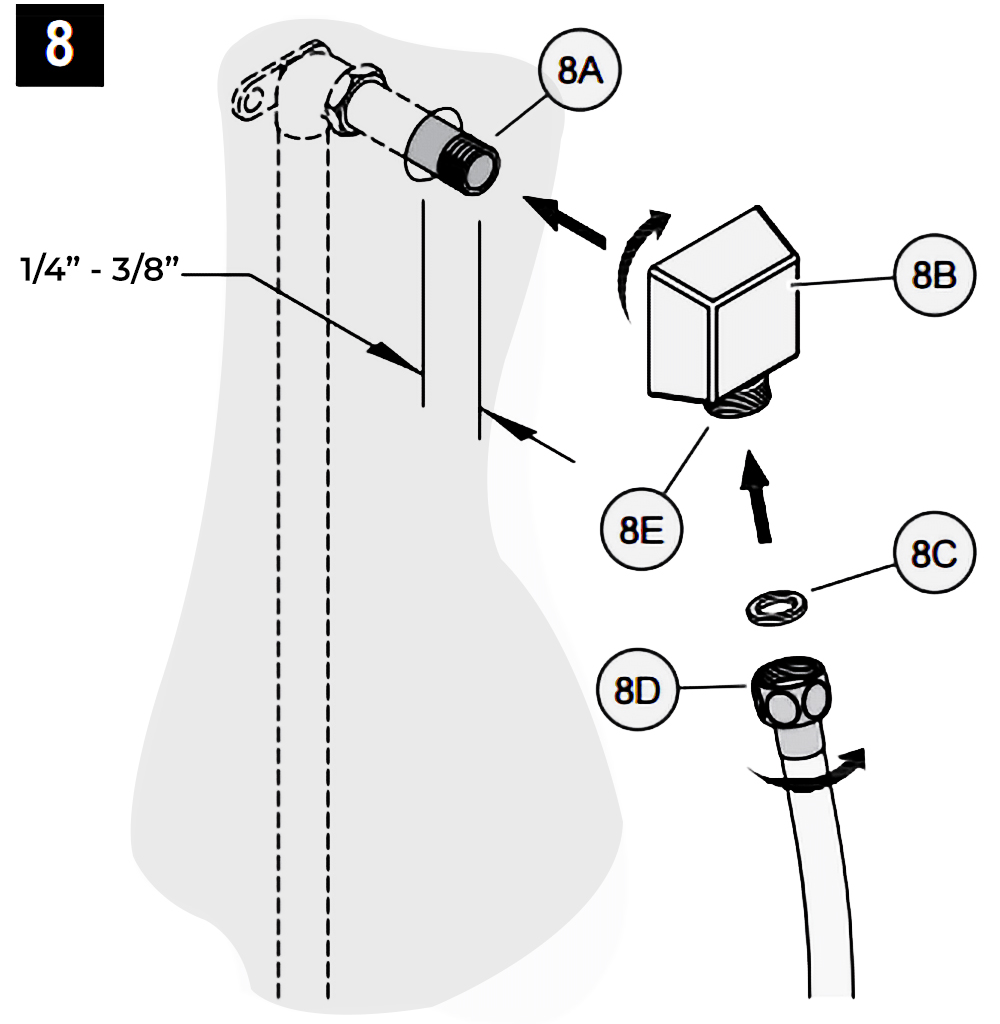
8. Drop Elbow & Hose Installation
Apply PTFE plumbers tape on both ends of Pipe Nipple (8A) (not included). Screw Pipe Nipple (8A) into the elbow inside the wall. The Pipe Nipple (8A) is to project 1/4” – 3/4” from the finished wall. Screw Drop Elbow (8B) onto Pipe Nipple (8A) and tighten until Drop Elbow (8B) is property positioned and flush to the finished wall.
Place Rubber Seal (8C) inside Hex Hose Fitting (8D). Connect Hex Hose Fitting (8D) into Drop Elbow Outlet (8E) by turning Hex Hose Fitting (8D).


9. Unit Start Up
Turn on hot and cold water supplies, and check al connections for leaks.

10. Final Flushing
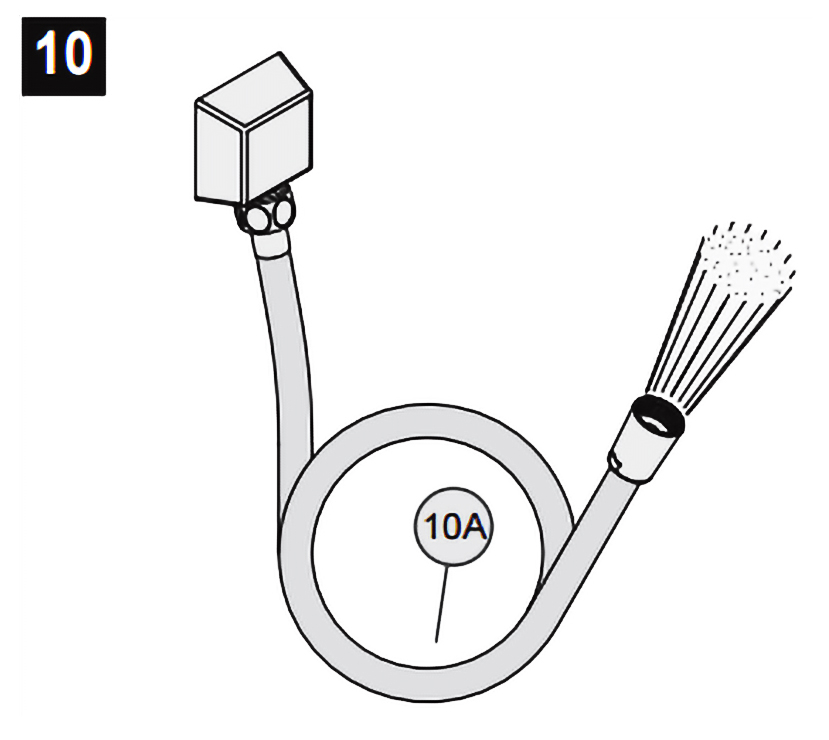
For final flushing, turn valve on and allow water to run through the Hose (10A) for several minutes. Allow water to run for several minutes until all foreign matter clears the line.


11. Shower Arm Installation
Place Rubber Seal (11A) inside Tapered Hose Fitting (11B). Conned Hand Shower (11C) to Hose (11D) by turning Tapered Hose Fitting (118) clockwise.

Warning: Make sure Hand Shower (11C) is securely tightened to Hose (11D).


Shower Body Jets Installation
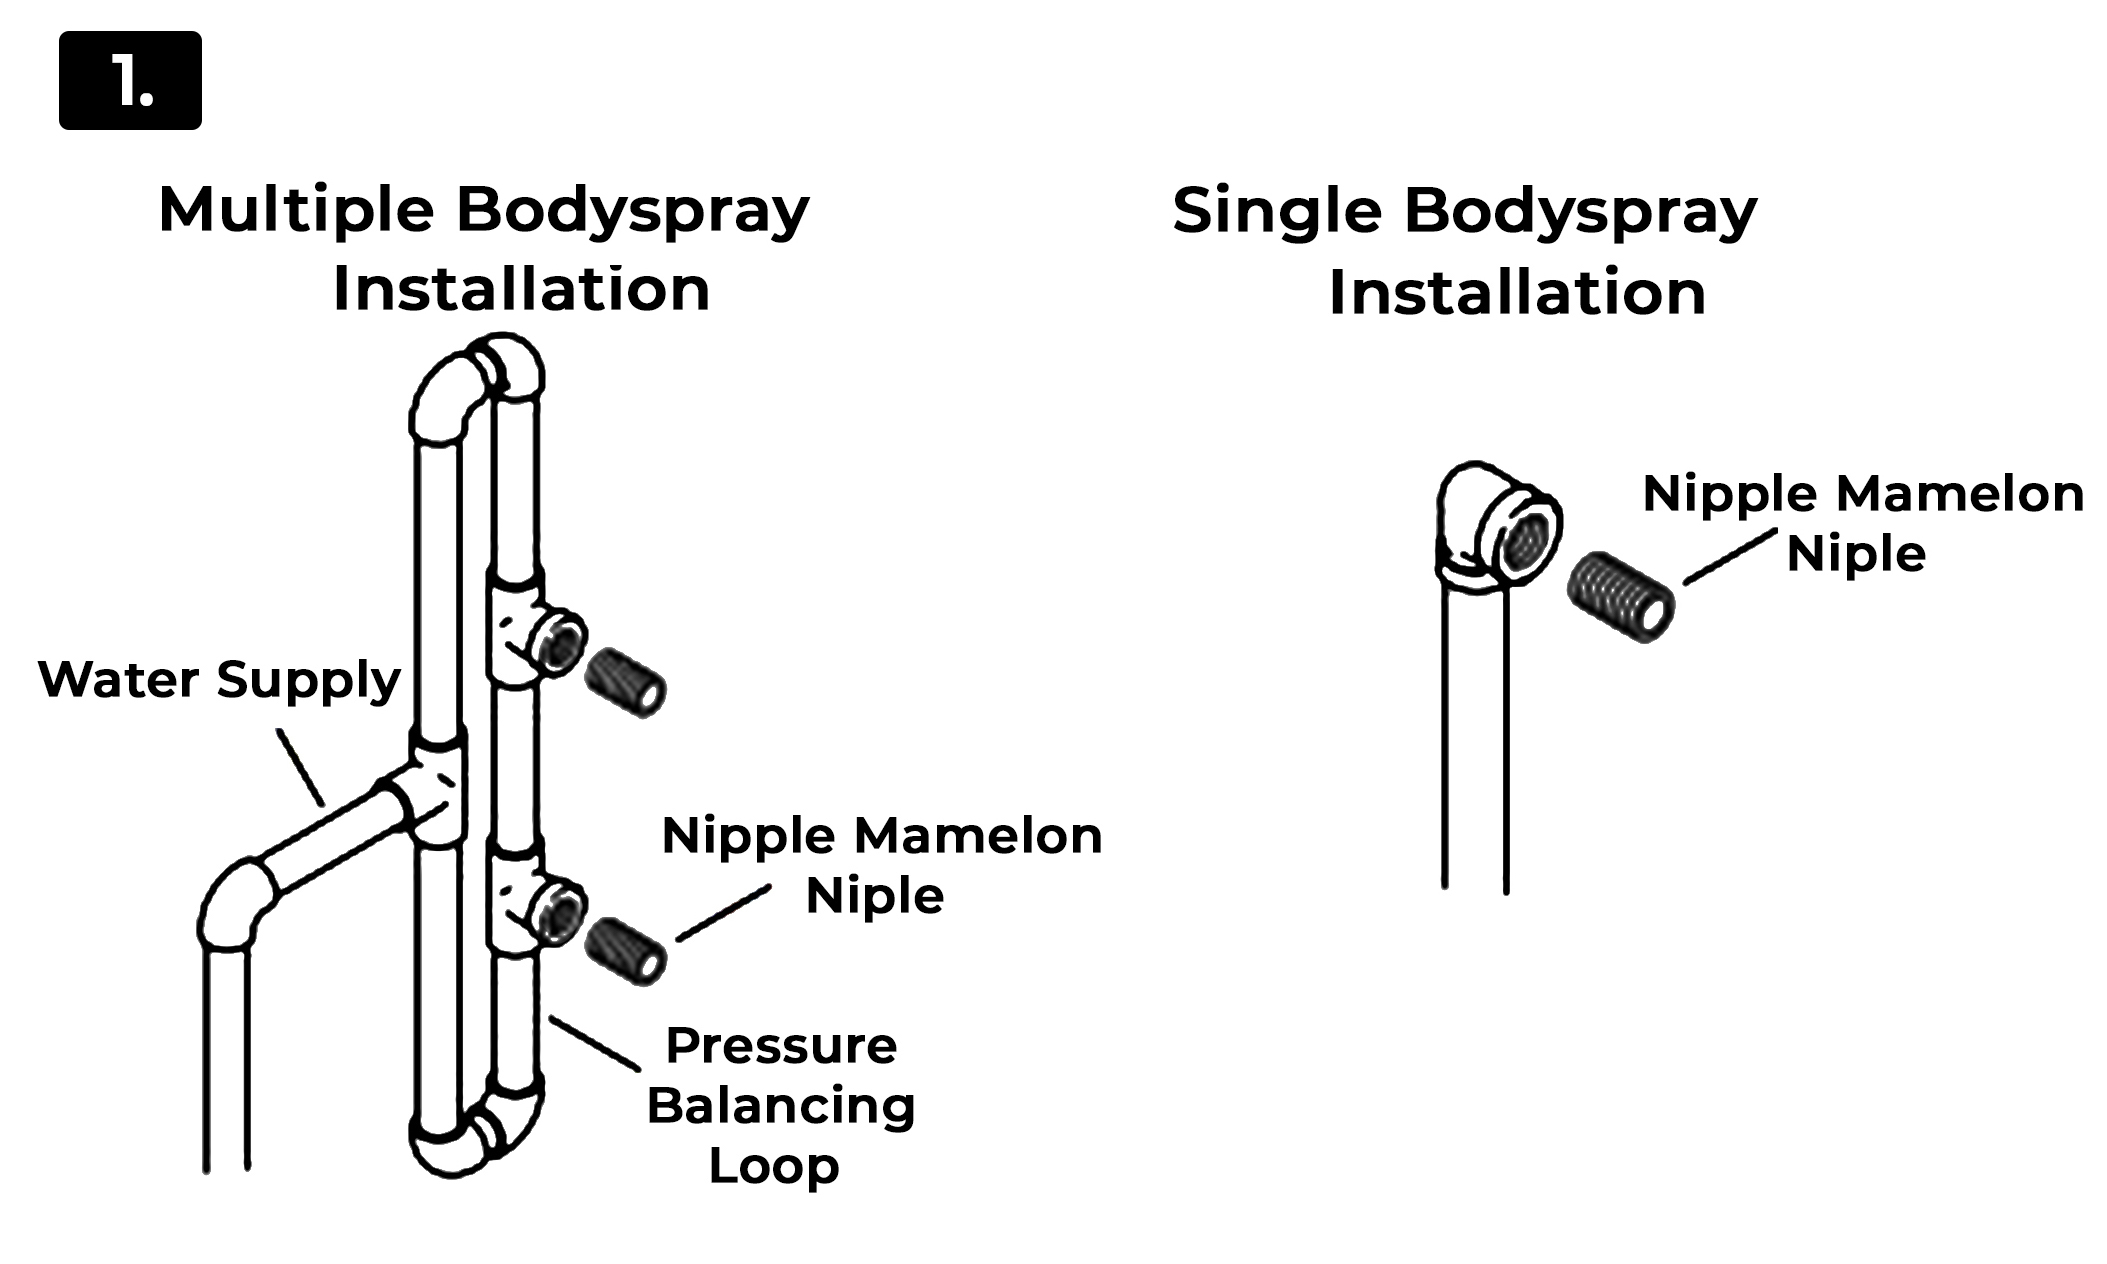


Multiple Bodyspray Installation
• Water Supply
• Nipple Mamelon Nipple
• Pressure Balancing Loop

1. Route the water supply lines.
2. If installing more than one bodyspray off the same supply line, construct a pressure balancing loop. Locate a tee along the loop at each bodyspray installation location.
3. Do not strap the pipes at this time.

Single Bodyspray Installation
• Nipple Mamelon Nipple
1. Route the water supply line.
2. Install an elbow to the end of the supply pipe at the bodyspray installation location.
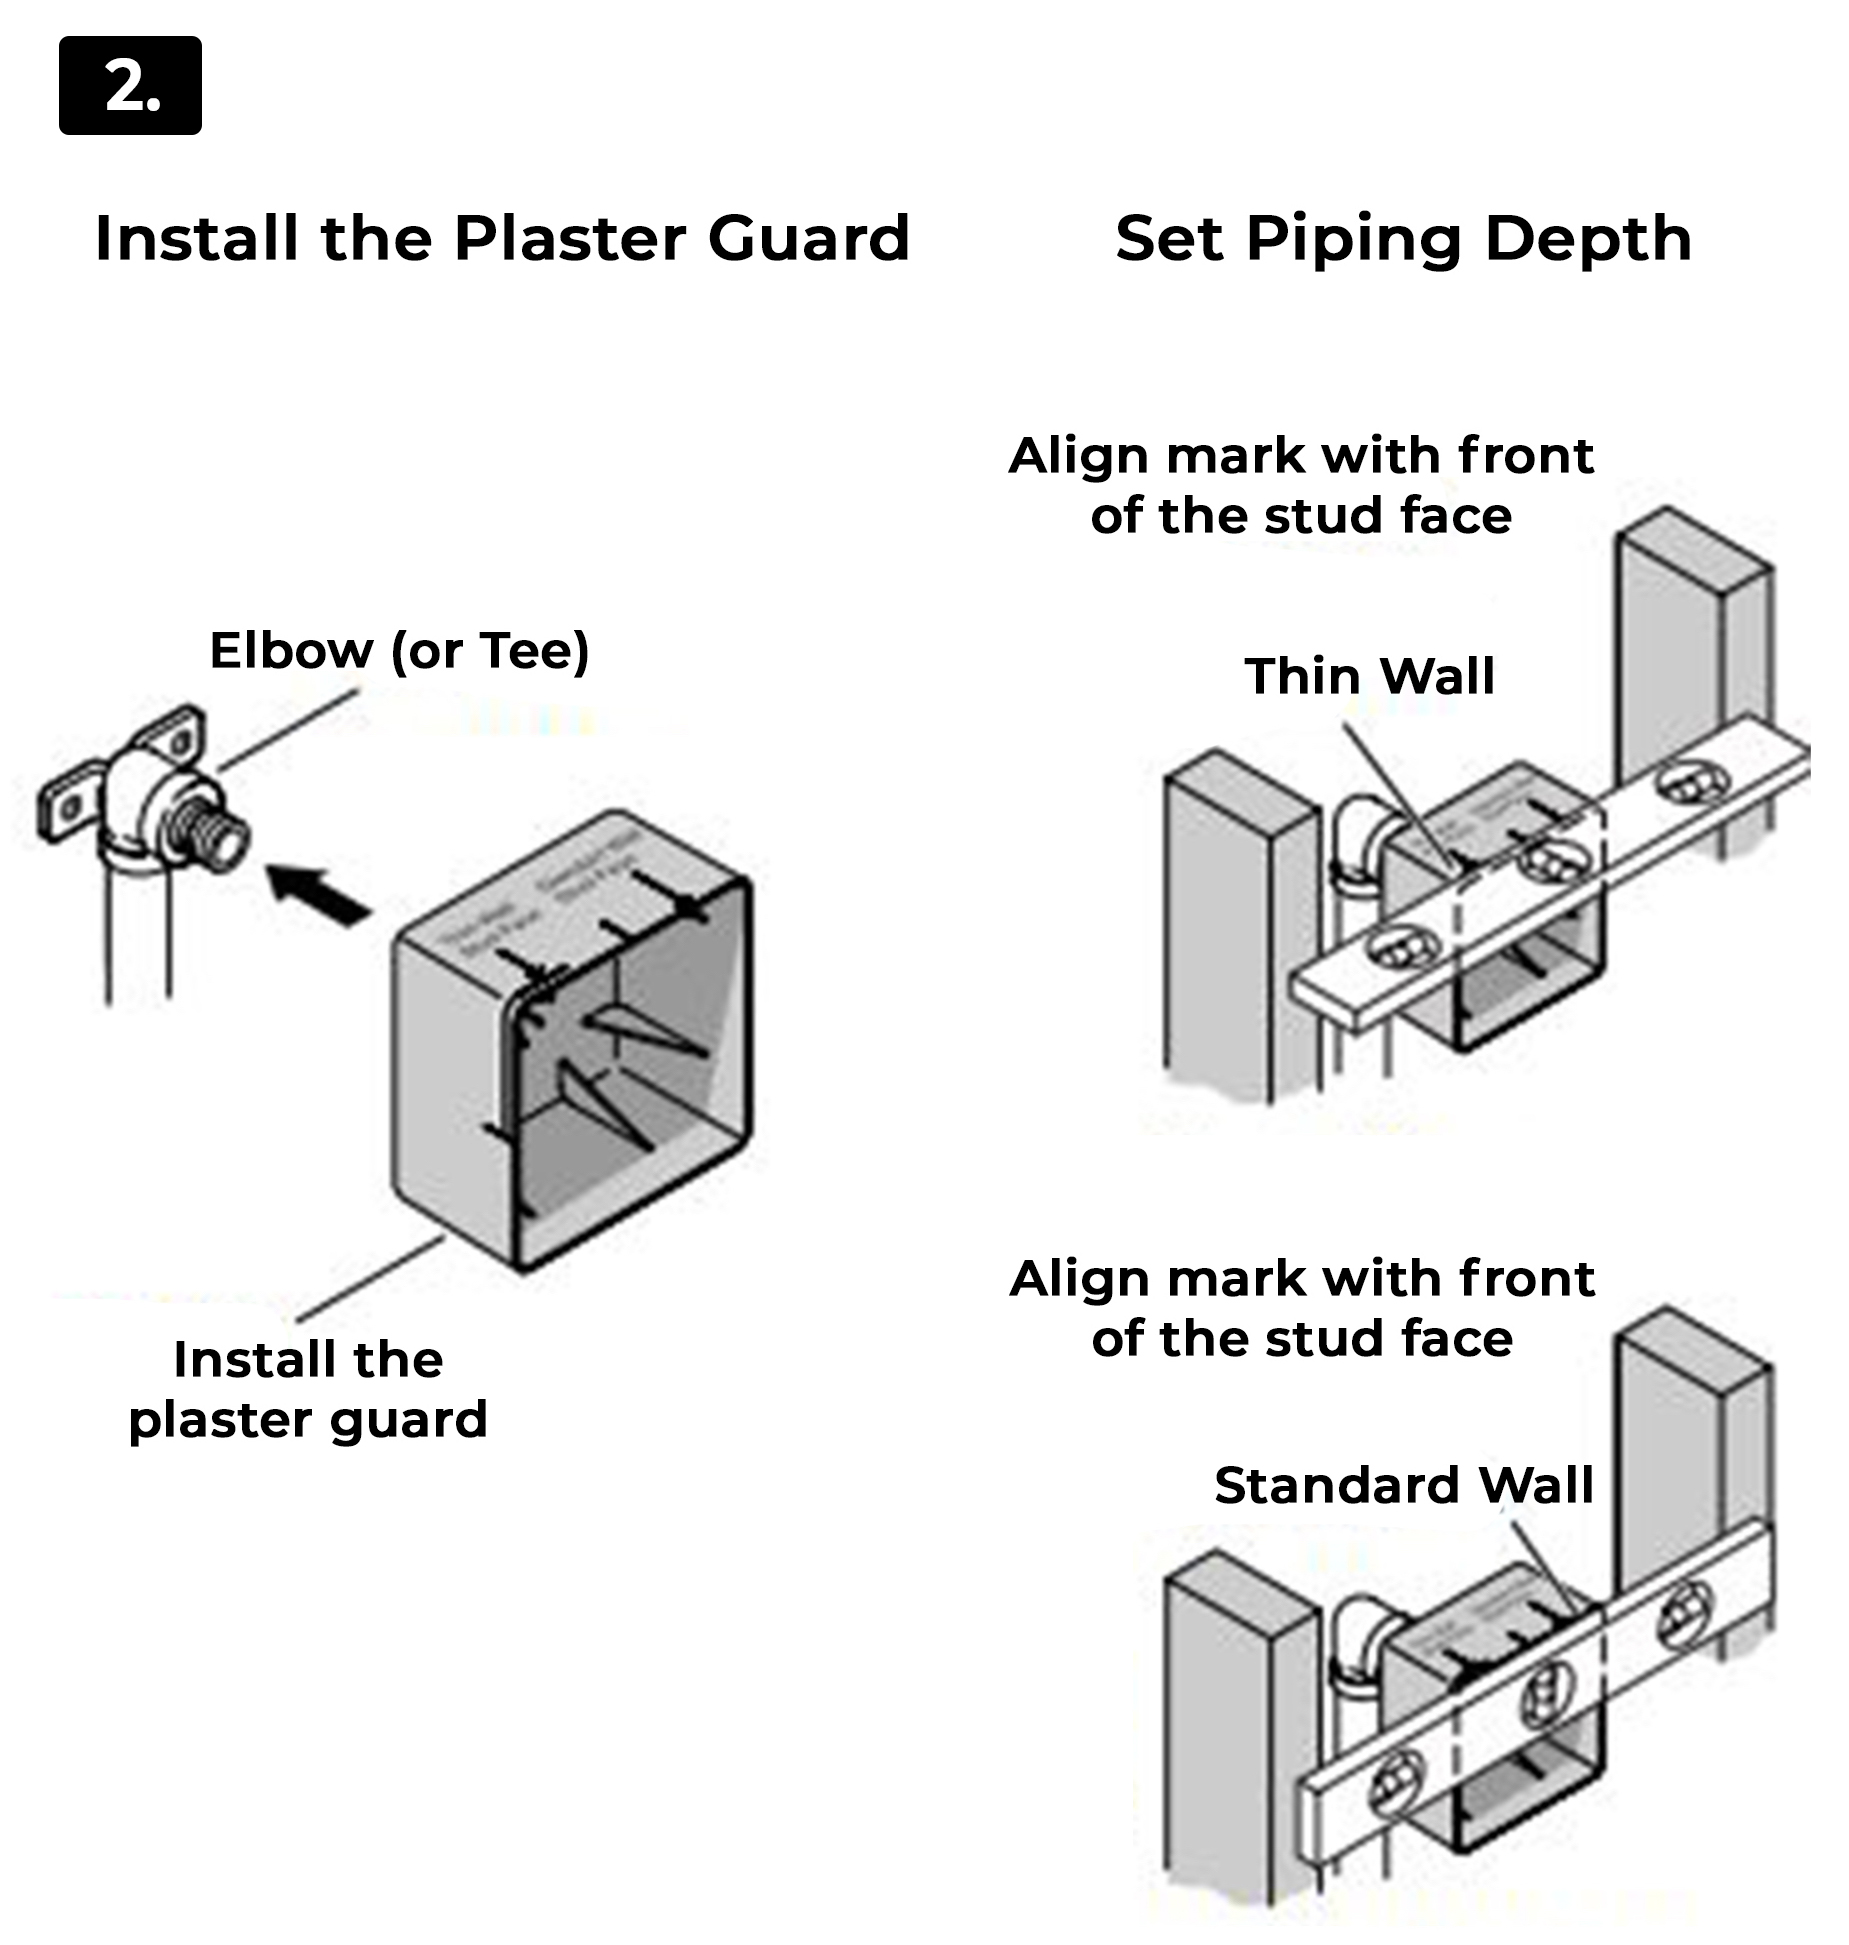

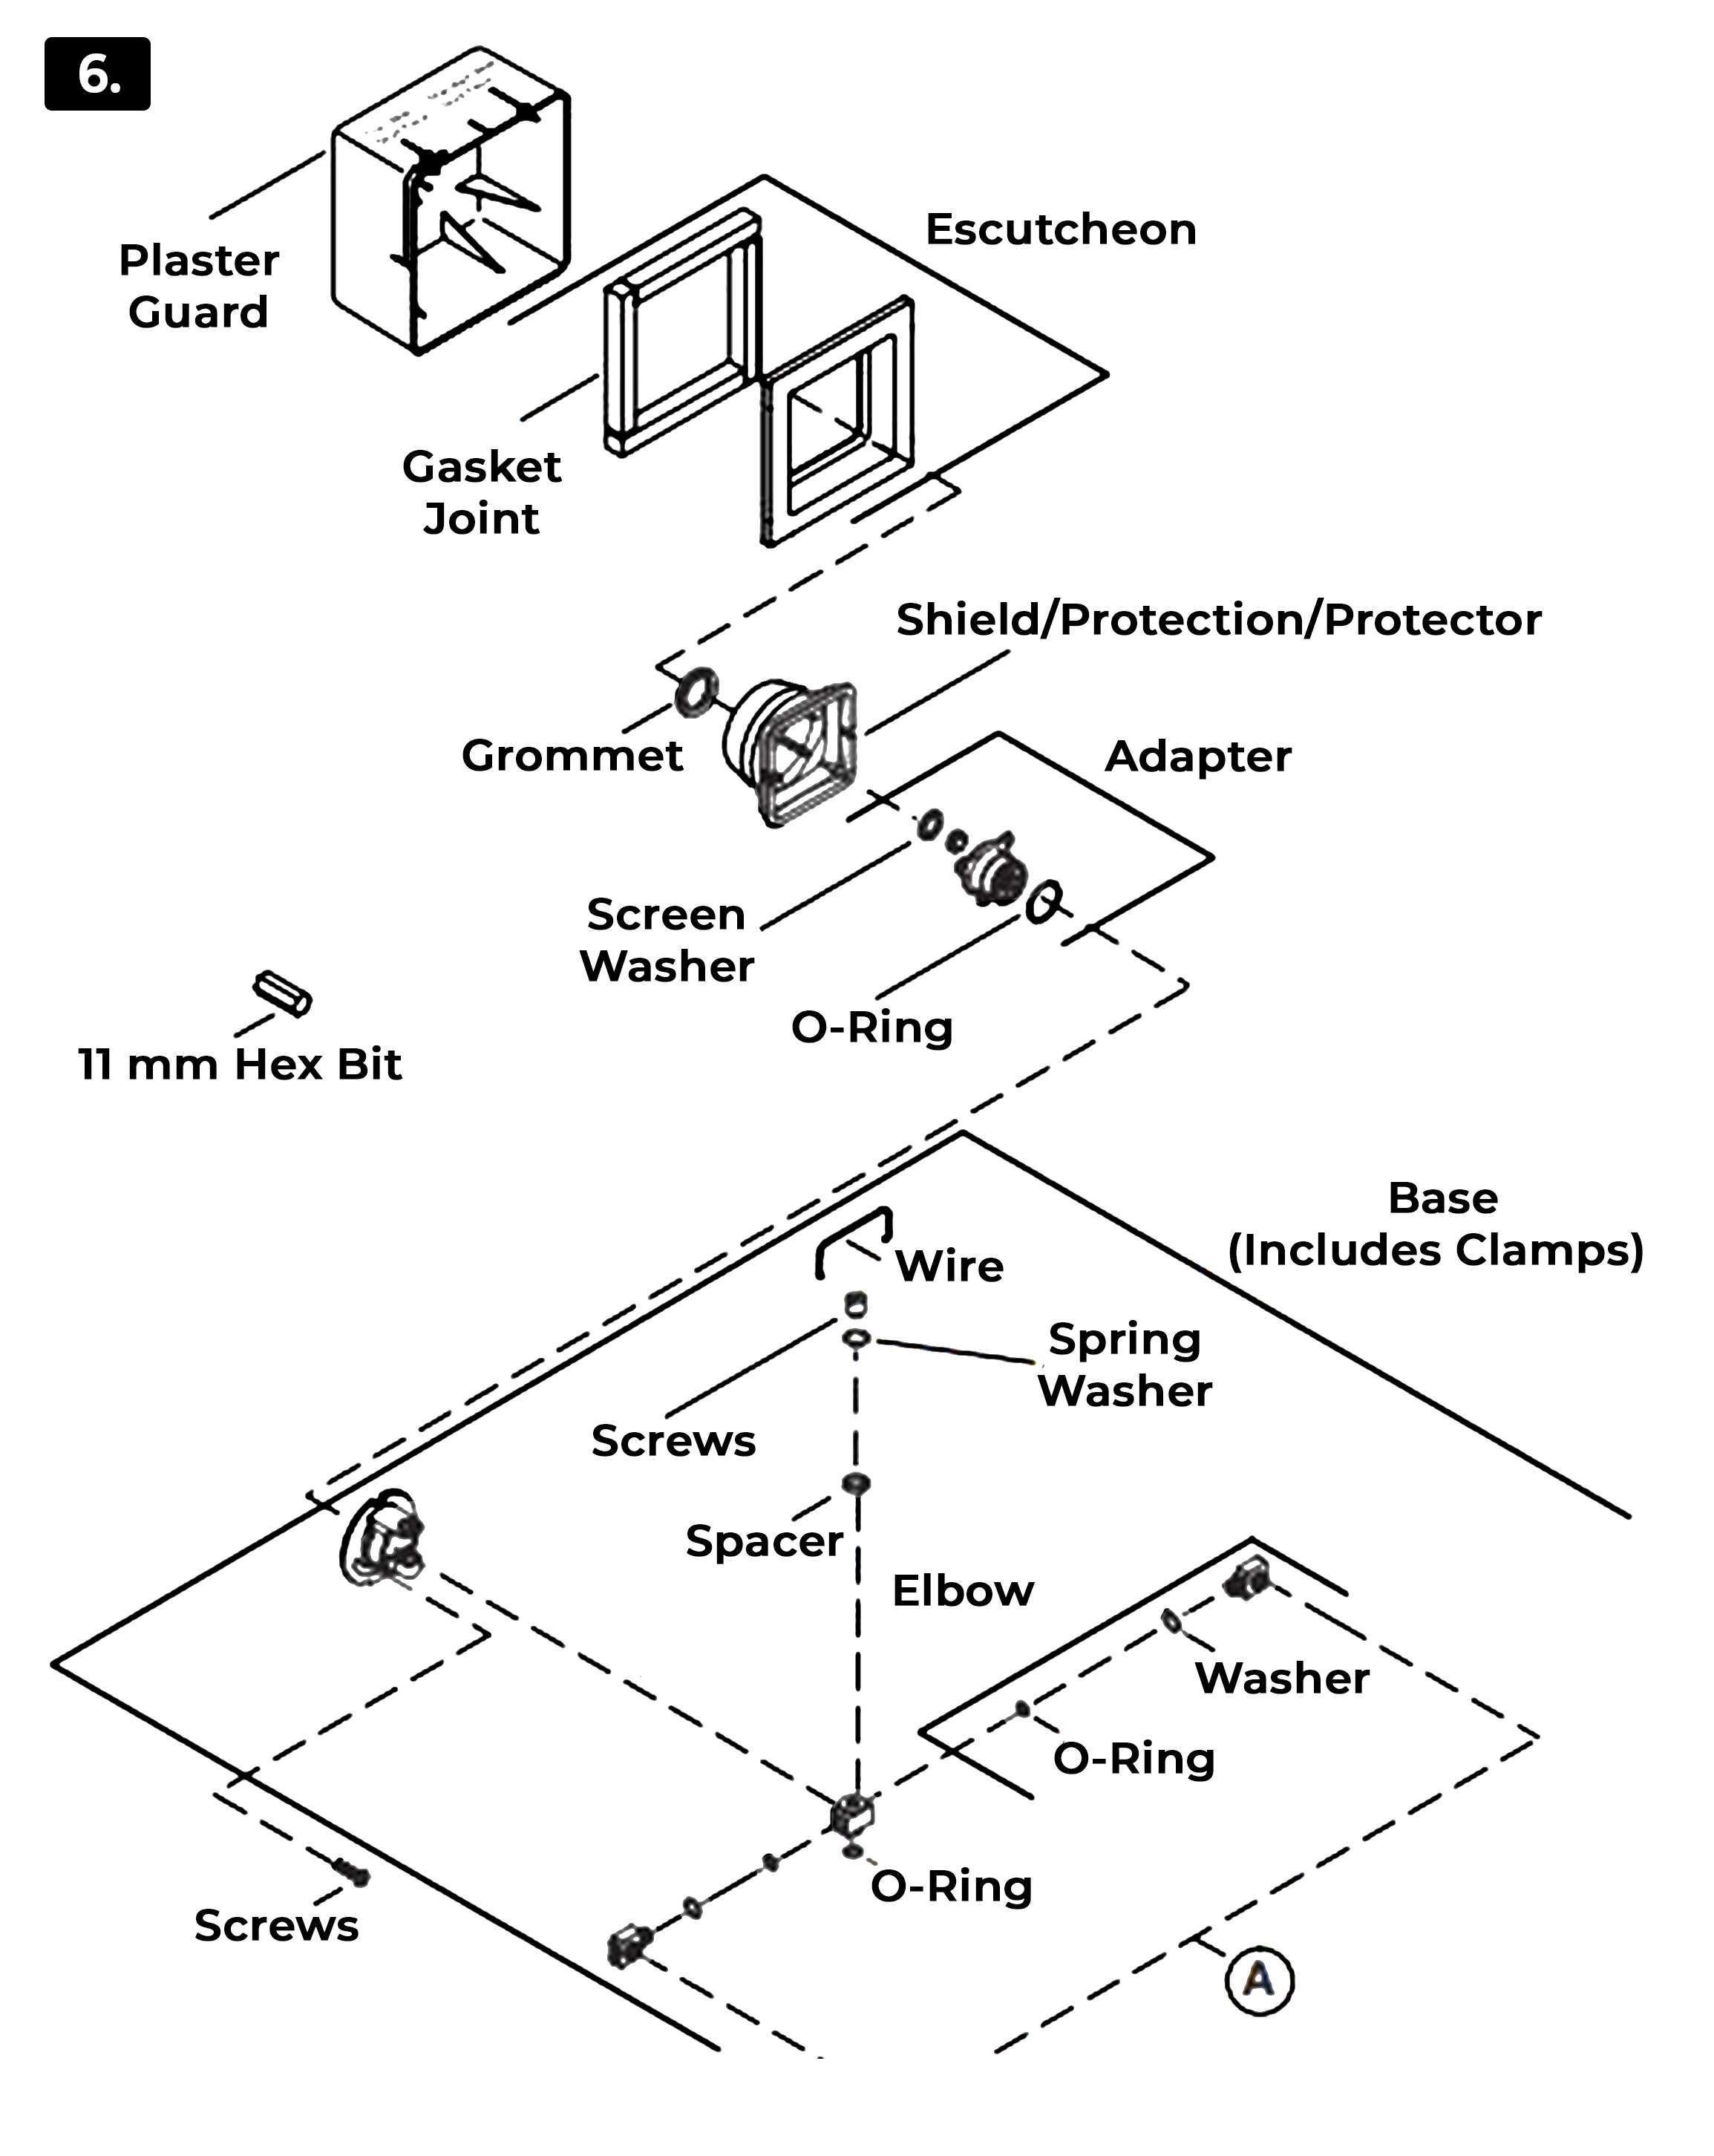
Install the Plaster Guard
Elbow (or Tee)
Install the plaster guard

Set Piping Depth
Align mark with front of the stud face
Thin Wall

Align mark with front of the stud face
Standard Wall

Install the plaster guard. Push until the plaster guard is snug against the face of the elbow (or tee).
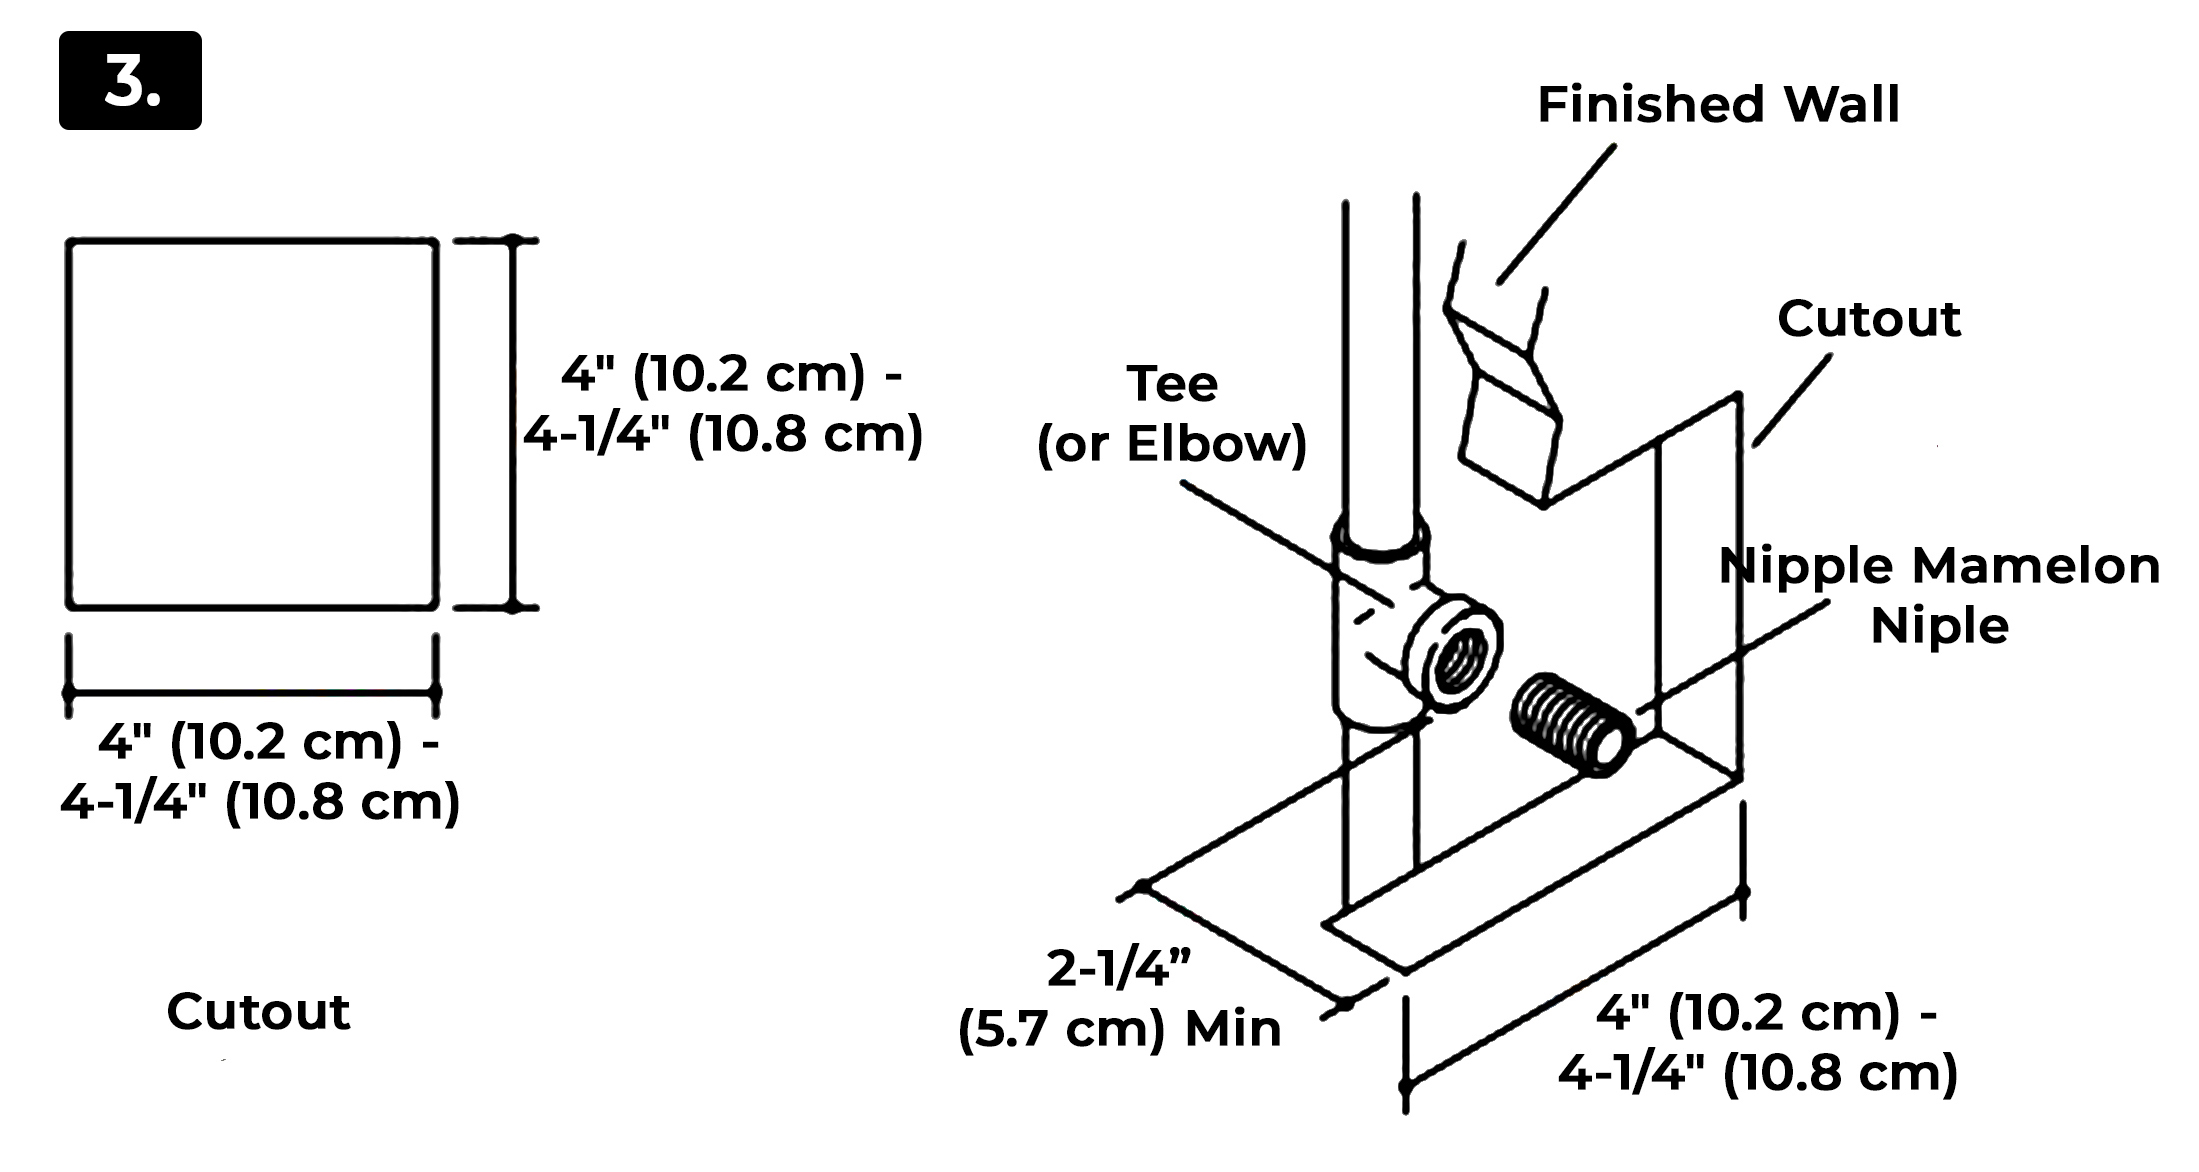


1. Install the water-resistant wall board.
2. Cut out a 4" (10.2 cm) to 4-1/4" (10.8 cm) square at each the installation location.
3. Install the finished wall material.
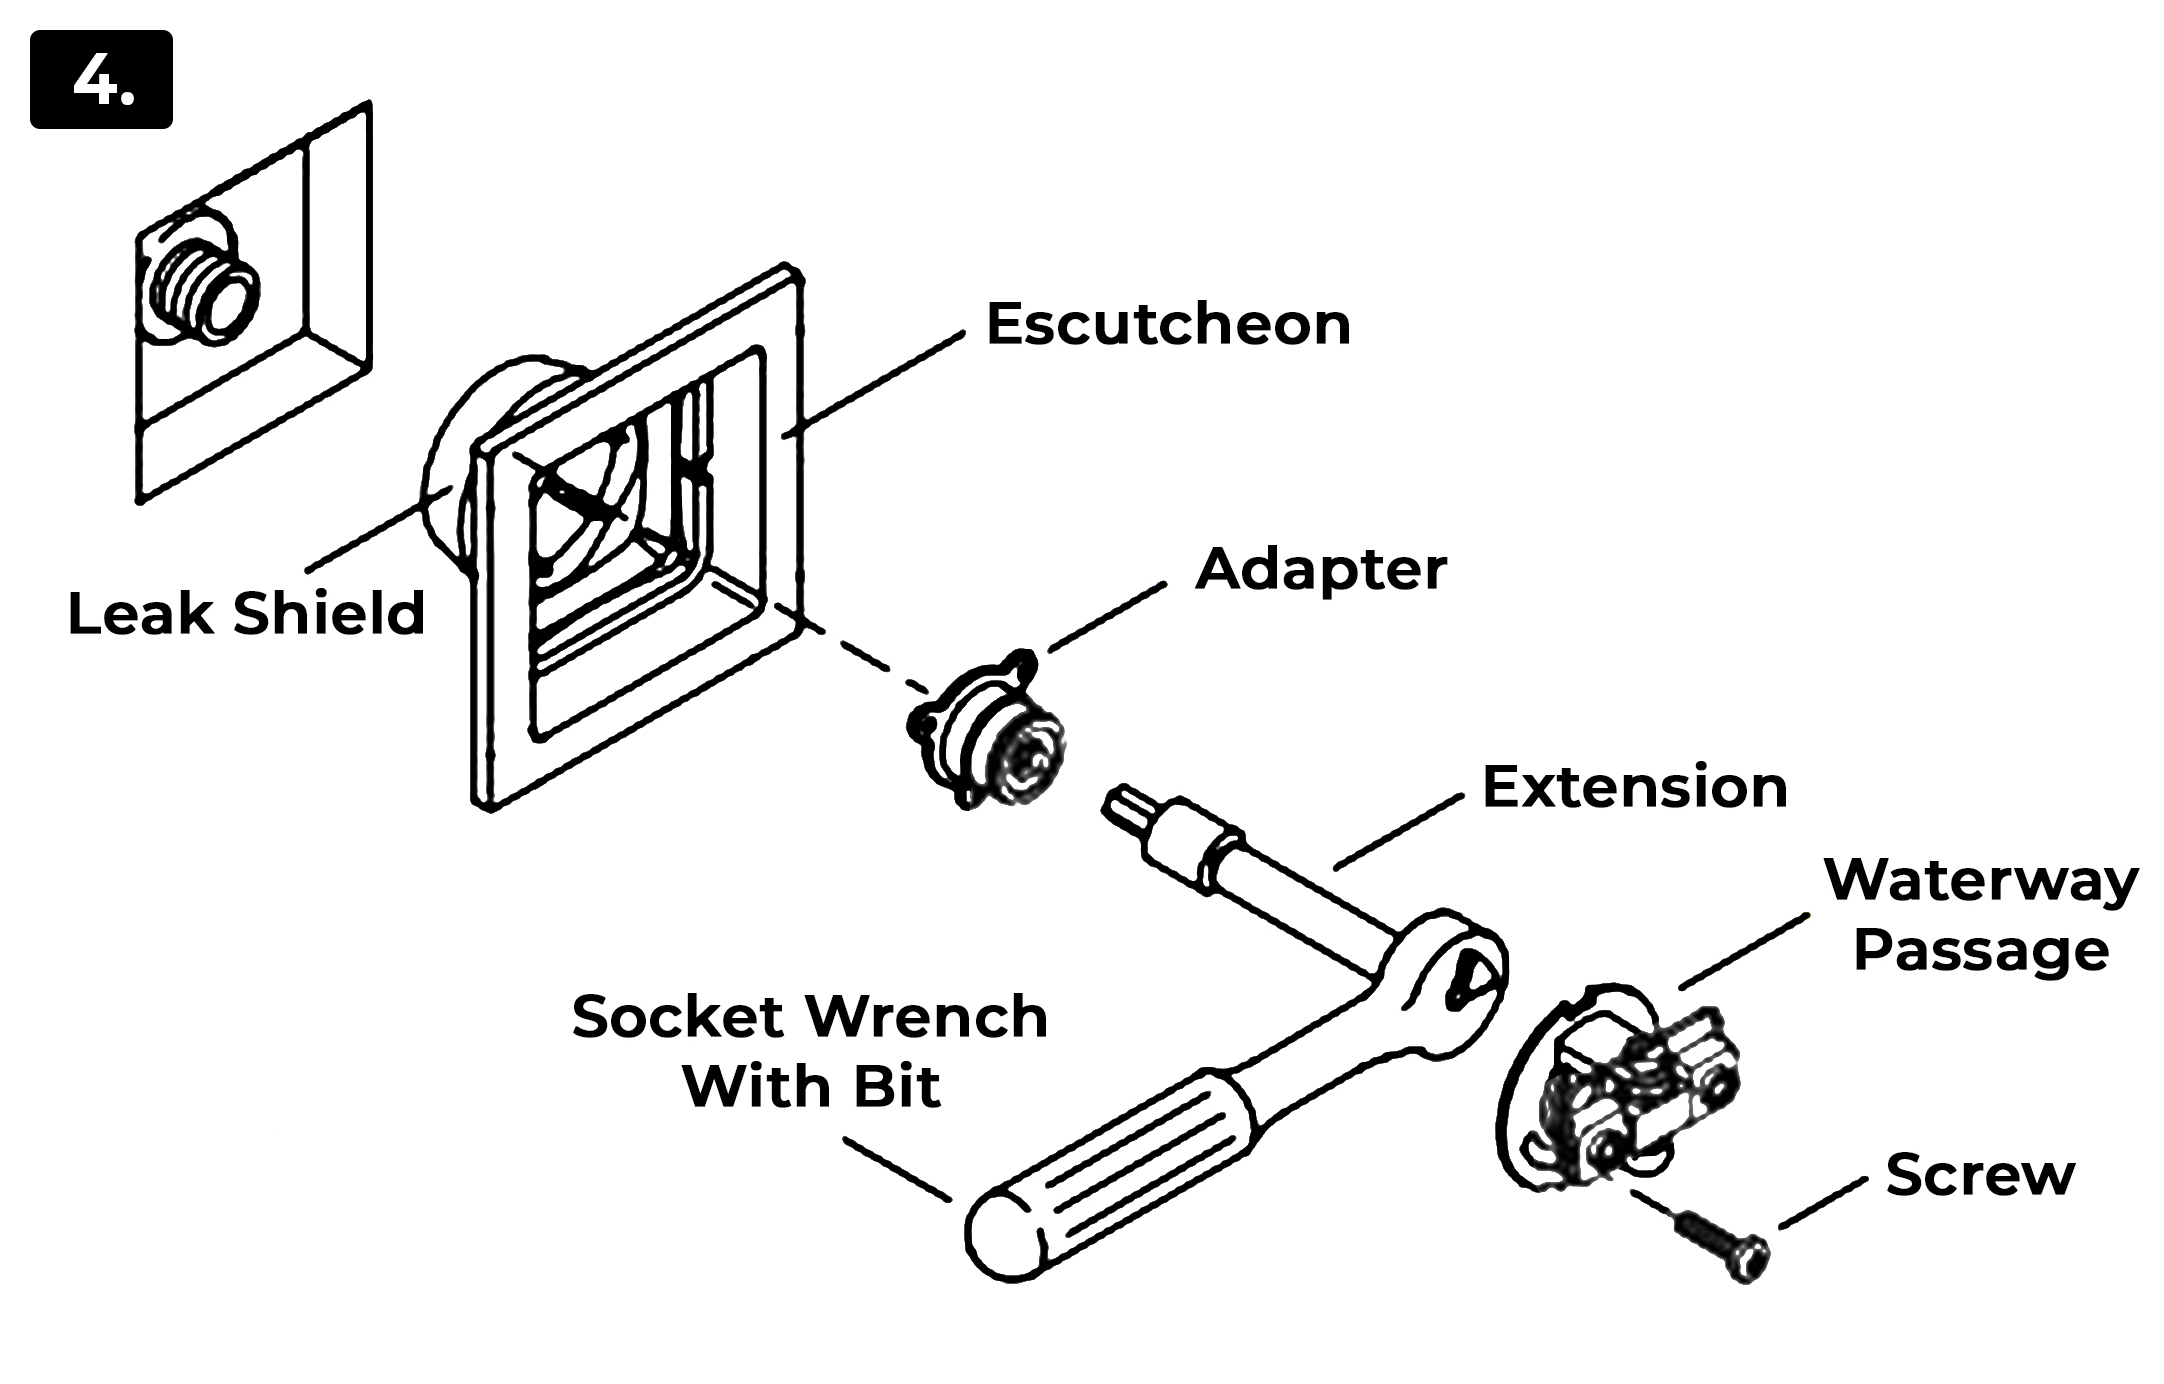

Escutcheon
Leak Shield
Adapter
Extension
Socket Wrench With Bit
Screw
Waterway Passage

1. Insert the escutcheon into the rough opening. The double ribs of the leak shield should be facing up.
2. If the leak shield makes contact with the elbow: Enlarge the hole in the back of the leak shield to 1-1/4" (3.2 cm).
3. Thread the adapter onto the nipple using the provided 11 mm bit, 11 mm or 7/16" socket, extension and socket wrench. Use masking tape to hold the bit in place, as the bit could fall off and cause damage.
IMPORTANT! The escutcheon should sit loosely at this point. If it is tight against the wall, use a longer pipe nipple.
4. Align the groove in the waterway with the double ribs on the leak shield.
5. Press the waterway into place over the adapter. Secure the waterway to the adapter with the screw provided.
6. Verify that the escutcheon does not turn or shift.
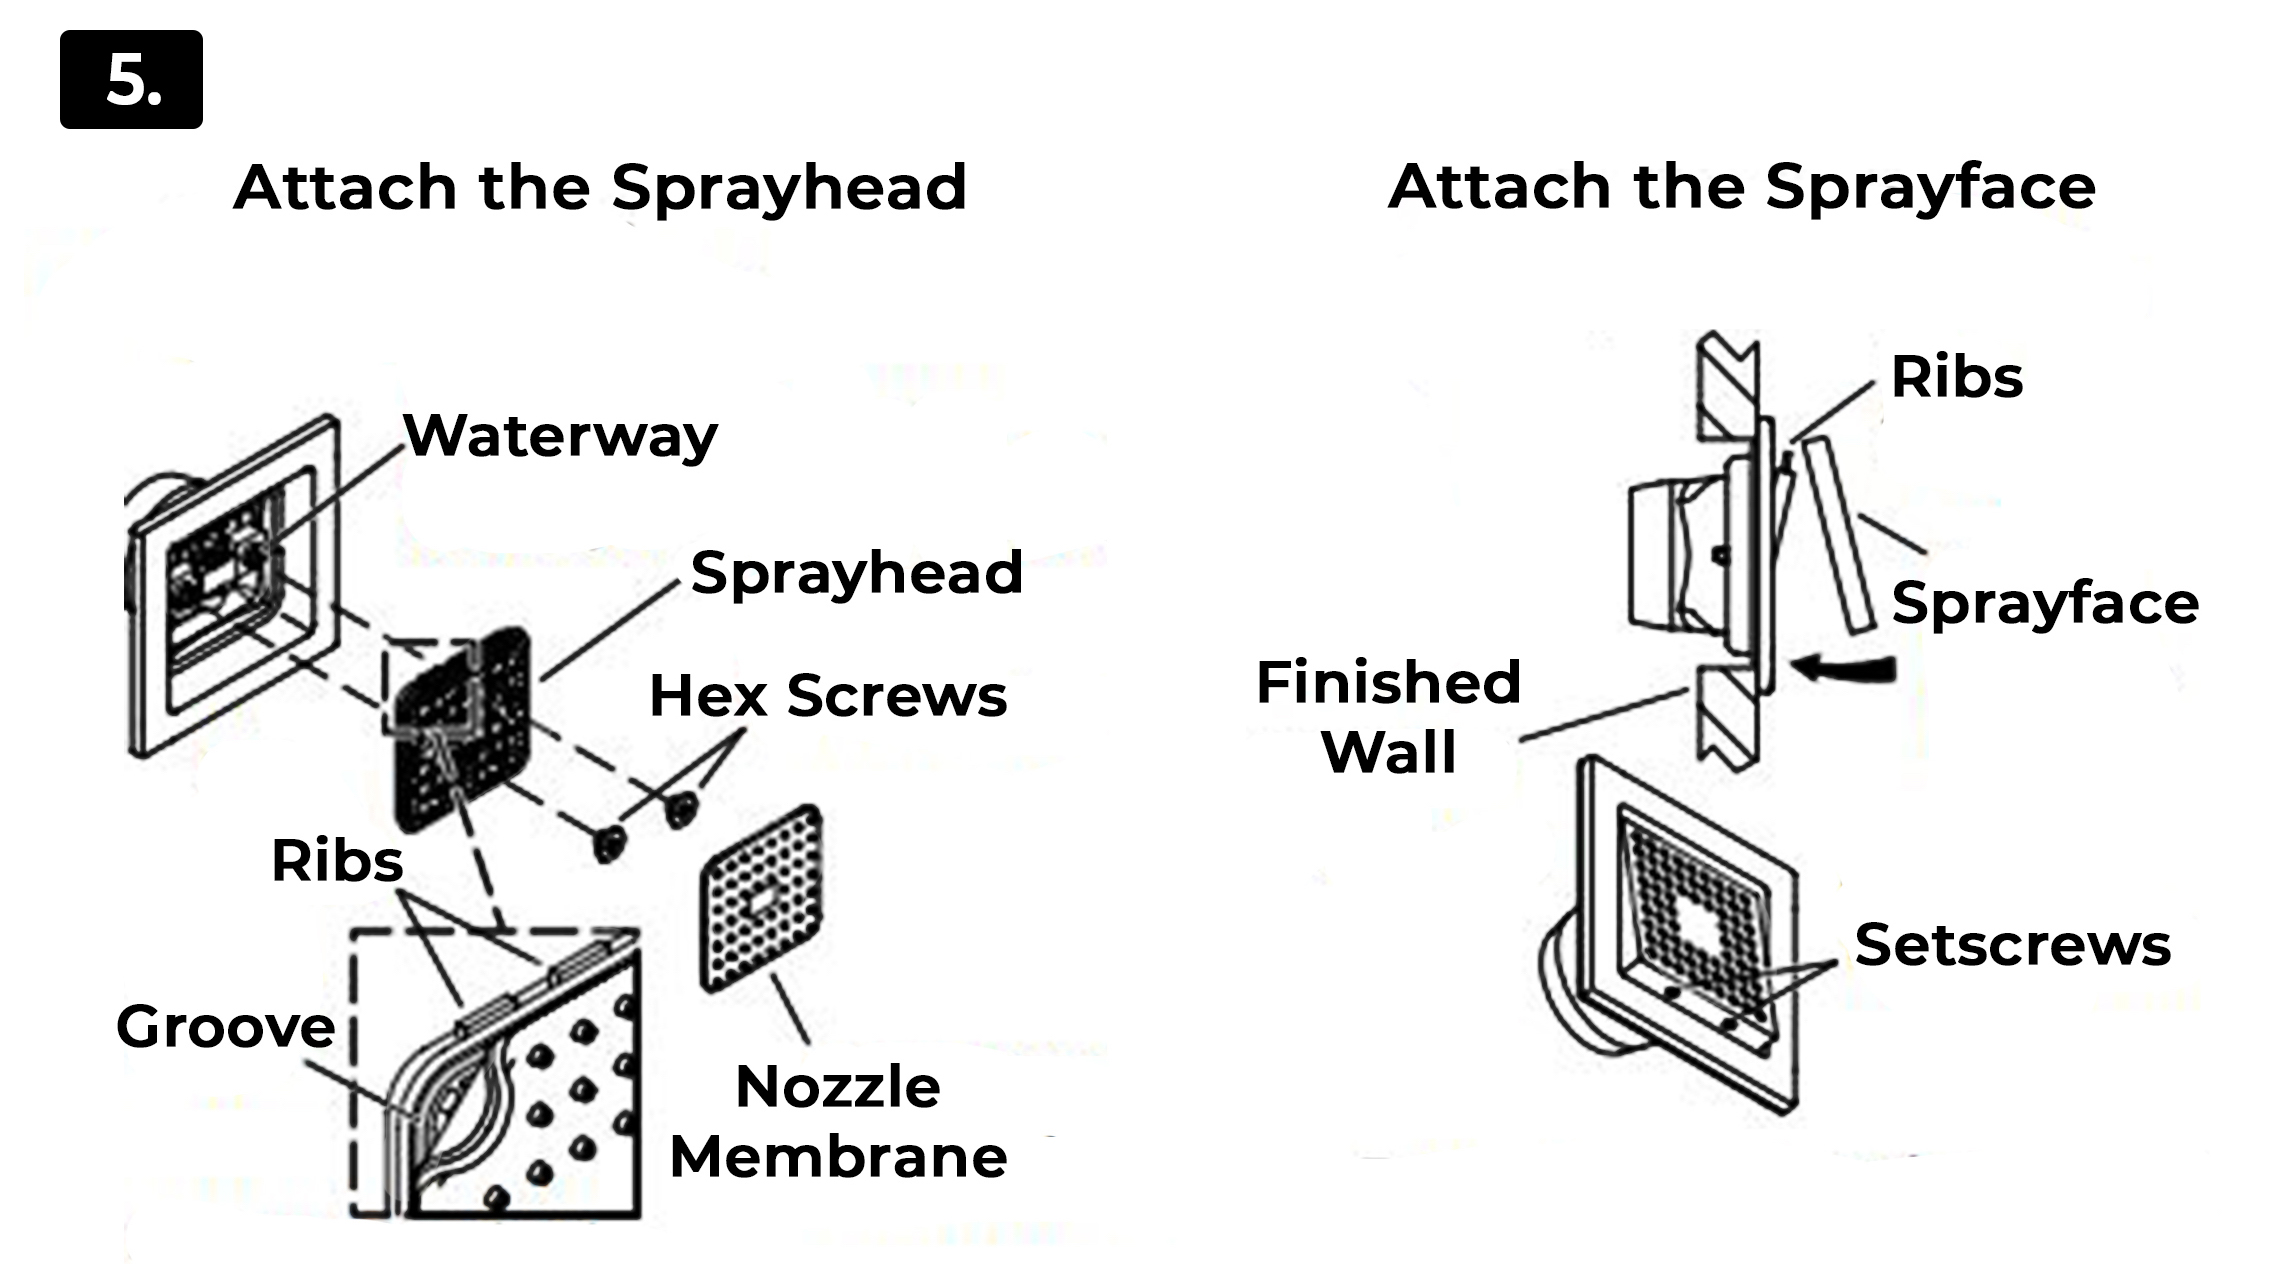


With the ribs of the sprayhead facing up, install the sprayhead to the waterway.


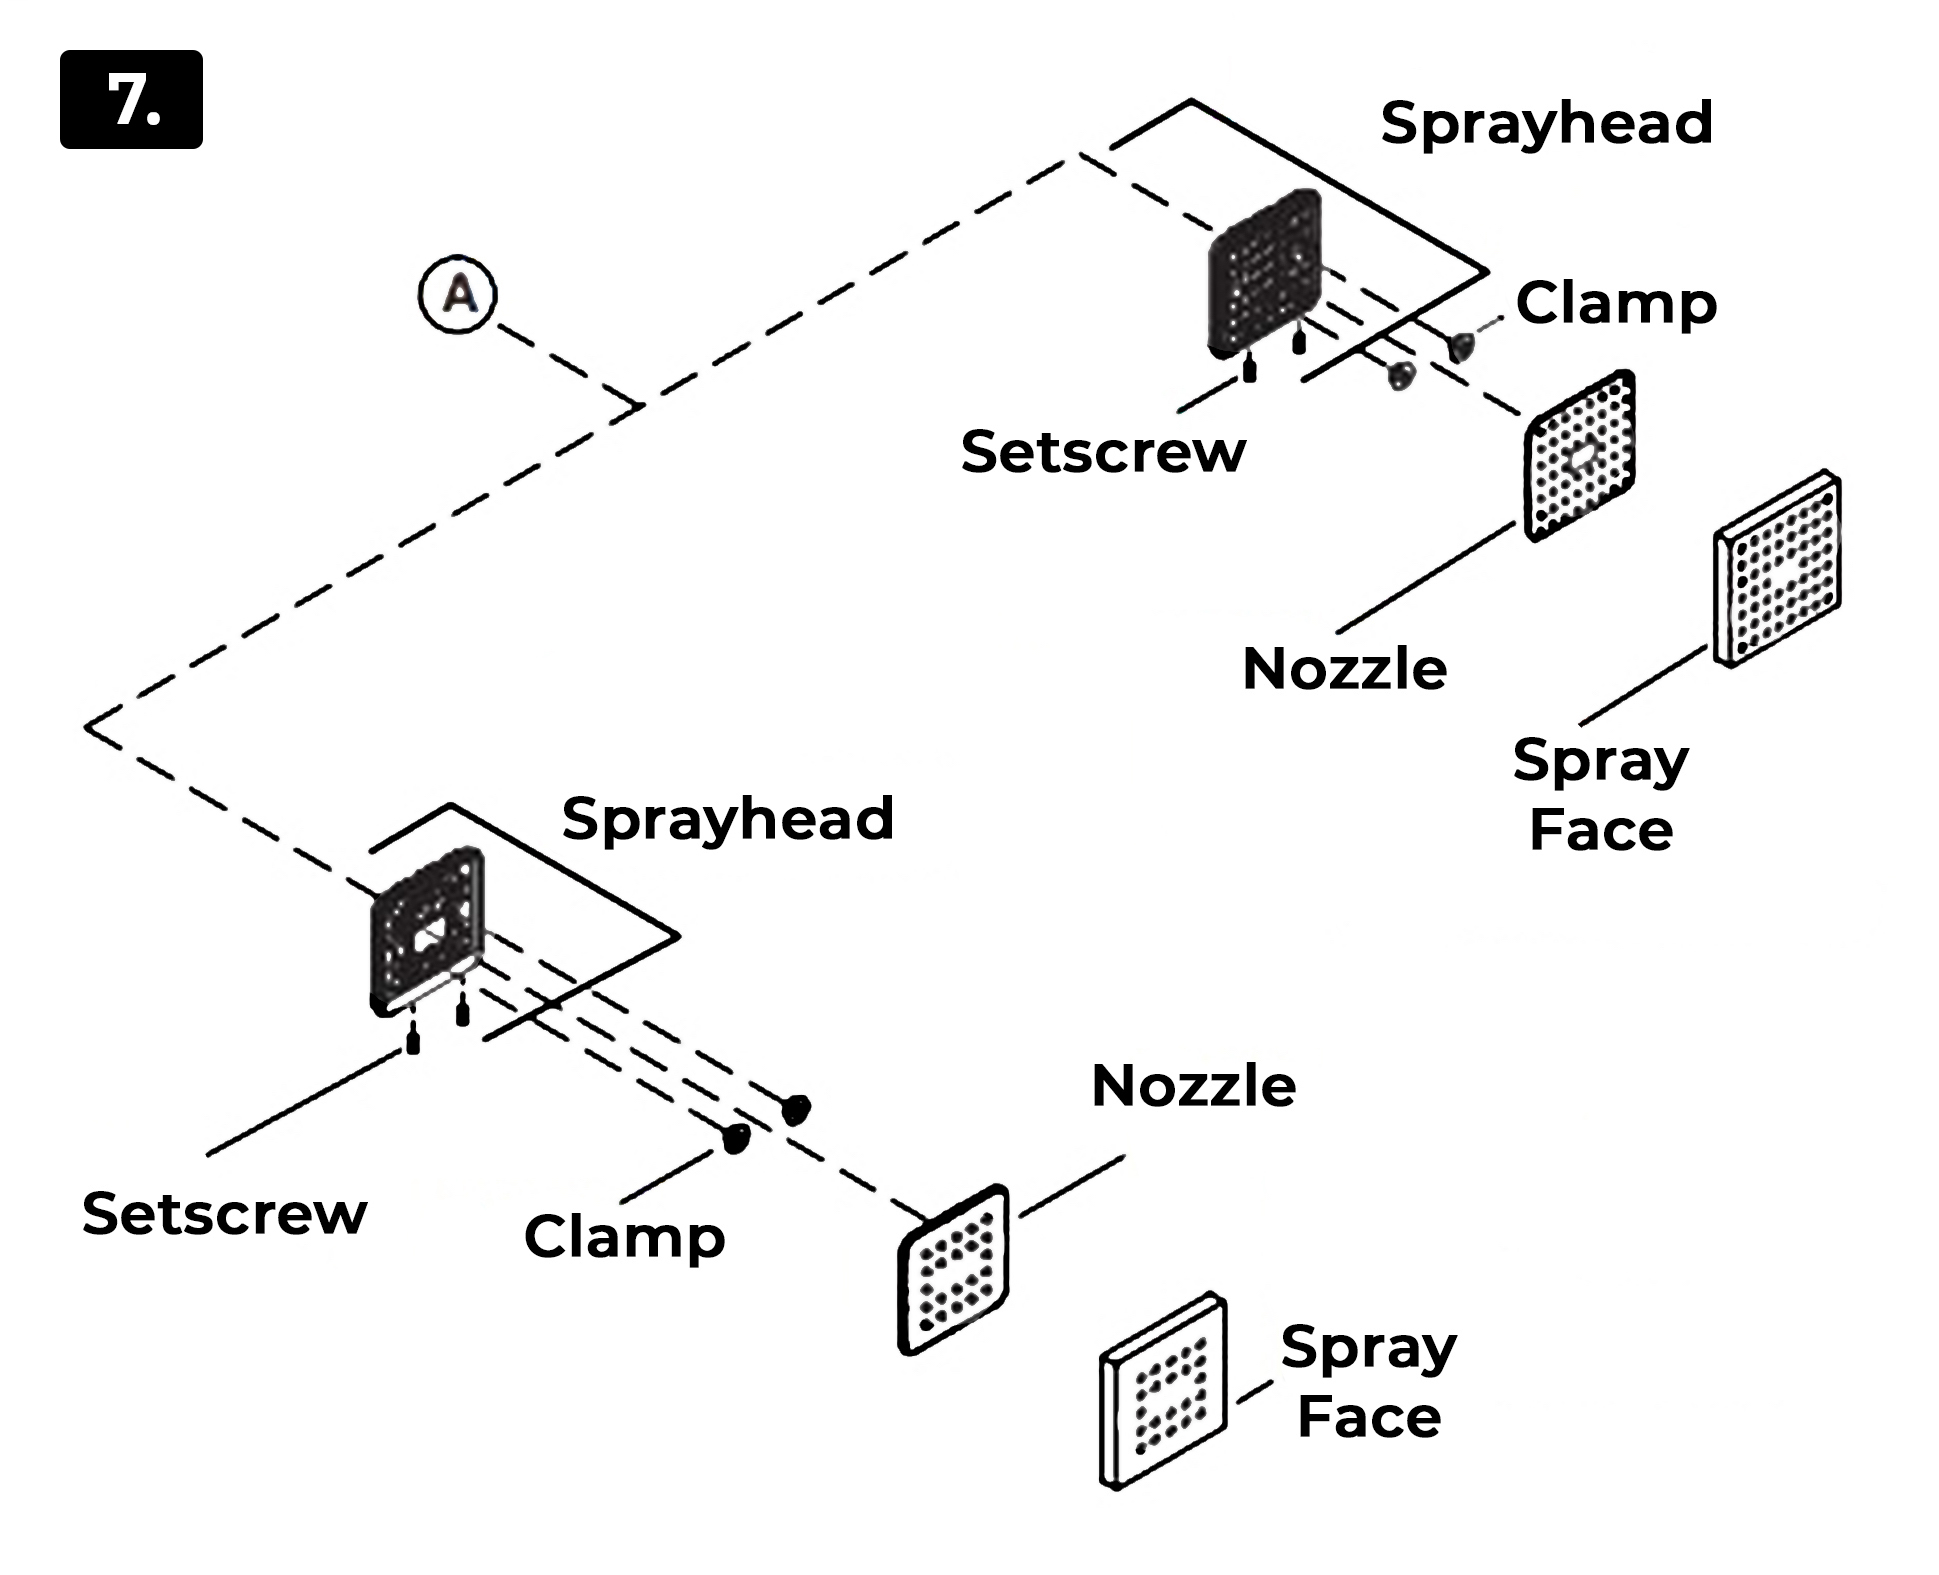
With the ribs of the sprayhead facing up, install the sprayhead to the waterway.


Best Shower Brand
2025 DESIGN INSPIRATION


Luxury Shower System


Designer Brand Shower Systems

BathSelect specializes in crafting bespoke shower systems and designer bath fixtures, offering a wide array of options to enhance your bathroom ambiance. Whether you seek luxurious shower setups, orbital designs, MultiColor LED showers, sleek Aluminum sets, Rio themes, waterfall features, or contemporary styles, we provide chic solutions tailored precisely to your needs. Our team of design mavens assists you in choosing and specifying the ideal shower systems, ensuring a perfect fit. We're dedicated to delivering top-notch bathroom fixtures blending comfort, reliability, and premium craftsmanship. Our product lineup spans Massage Showers, Touchless Sensor Faucets, LED Showers, Smart & Digital Showers, Body Massage Shower Jets, Shower Heads, Steam Shower Rooms, Modern Bath Vanity Sets, and Bath Accessories, showcasing cutting-edge bathroom technology. Embracing diversity, we cater to varied tastes with trending fixtures. Our commitment to customer satisfaction ensures a seamless shopping experience with easy checkout and swift delivery. Choose BathSelect for courteous treatment and exceptional service, guaranteeing your satisfaction at every turn.


Custom Shower Installation Systems


Frequently Specified by Architects for Aesthetics and quality

For Commercial Projects

If You Require Expert Advice! Reach Out to Our Team Members