Installation - Maine Contemporary LED Rainfall Thermostatic Shower Head
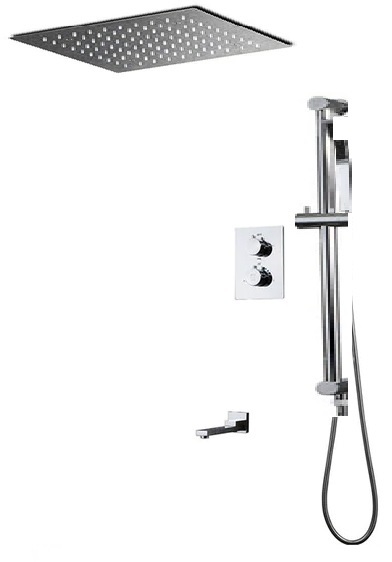
Maine Contemporary LED Rainfall Thermostatic Shower Head With Water Spout Slide Bar And Hand Shower In Chrome FinishThis is a Thermostatic 64-color LED shower that can be controlled using a remote control that pairs with a pressure-balancing valve, which maintains your desired water temperature during pressure fluctuations. Solid stainless steel construction with a chrome finish and a ceramic valve core material for long durability that will upgrade your bathroom with a modern and cool look. The Showerhead and jet have a rainfall function where you can experience the true feeling of rain. You can install the rain shower head and handheld showerhead where you like just depending on the position of the concealed water pipe.Features
- Brand Name: BathSelect
- Model number: BS9750
- Valve core material: Ceramic
- Type: With slide bar, shower mixer, faucet, and handheld shower
- Size: 11.85 - 15.7 inches ( 301-400 mm)
- Cold/hot water control type: Double handle double control
- Finished: Chrome Finish
- Shower Head Size: 11.8 * 11.8 inches (300 * 300 mm)
- LED Light: Need to Connect Power
- Shower Body Jet: 2 Inch, Rainfall Function
- Shower Faucets : 3 Functions
- Minimum water pressure requirement: 0.3 MPA
- Water Flow: 1.32- 5.54 gal (5-21 L / min)
- Style: Contemporary
- Handle number: Double handle
- Function: Thermostatic batteries
- Install: Embedded Ceiling Mount
BathSelect® Manufacturer Warranty Information
- Before you begin, please read the installation instructions below. Observe all local building and safety codes.
- Unpack and inspect the product for any shipping damages. If you find damages, do not install them.
- Please note all showers must be installed by a professional and certified plumber otherwise, warranty might be voided.
Shower
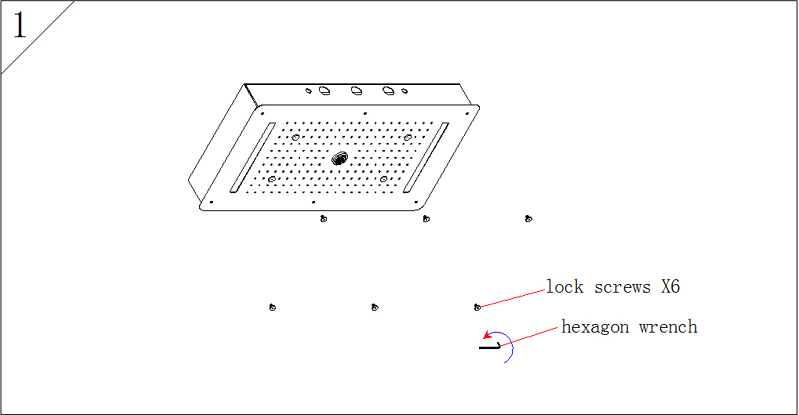
1. Use a hexagon wrench to lose the lock screws, then separate the showerhead assembly and bracket.
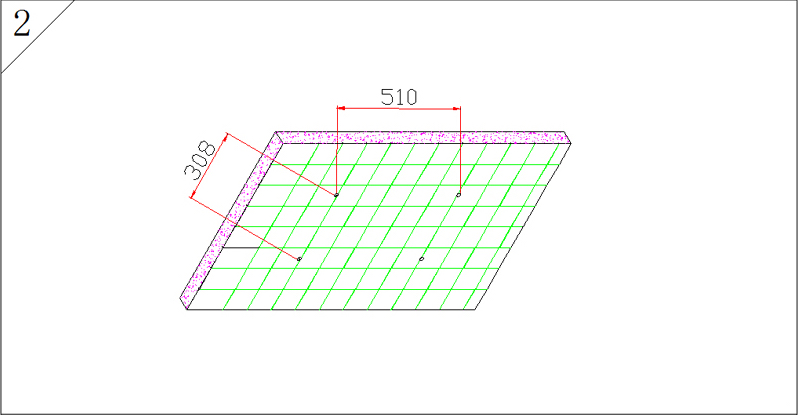
2. Dig 4 Ø10 holes in the ceiling according to the dimension of the screws.
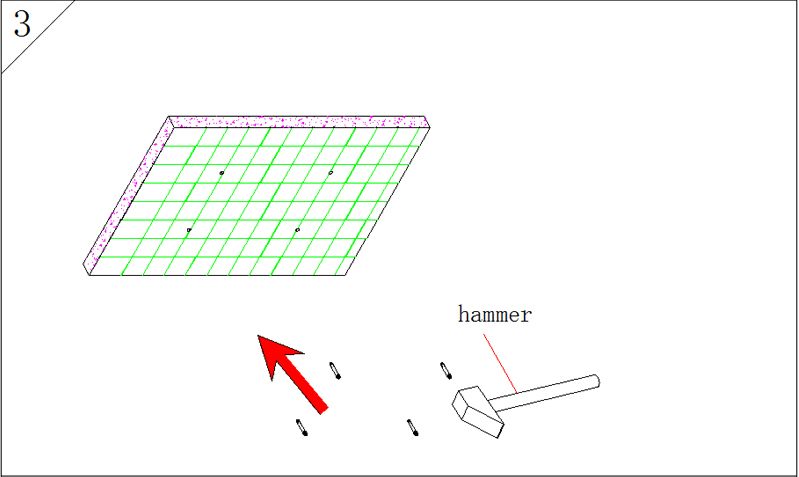
3. Use a hammer to thwack the four screws into four holes.
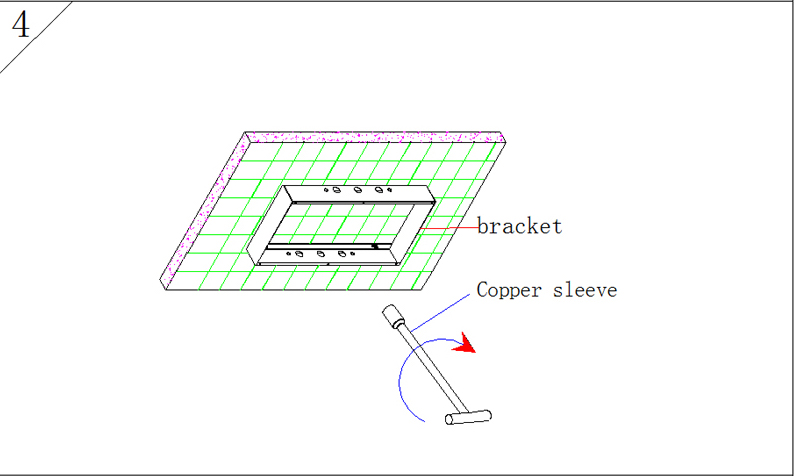
4. Install the bracket on the expansion screws, then use a copper sleeve wrench to lock four screws.
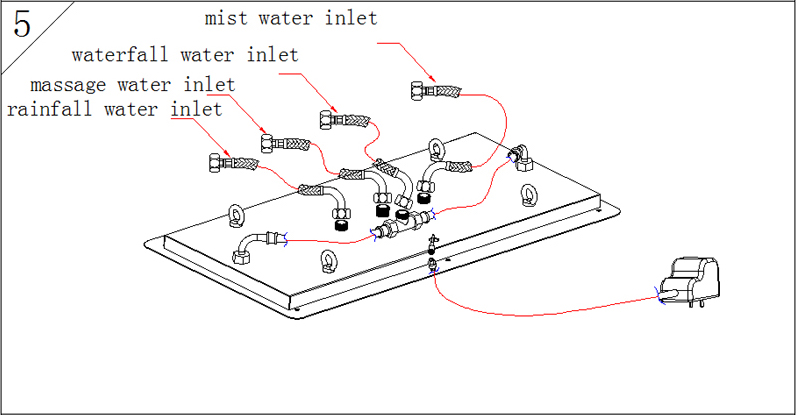
5. Make sure all the water inlet pipes are connected well without leaking before inserting the power plug into the socket.

6. Fix the shower assembly on the bracket by turning the locking bolt.
Shower Body Jets Installation
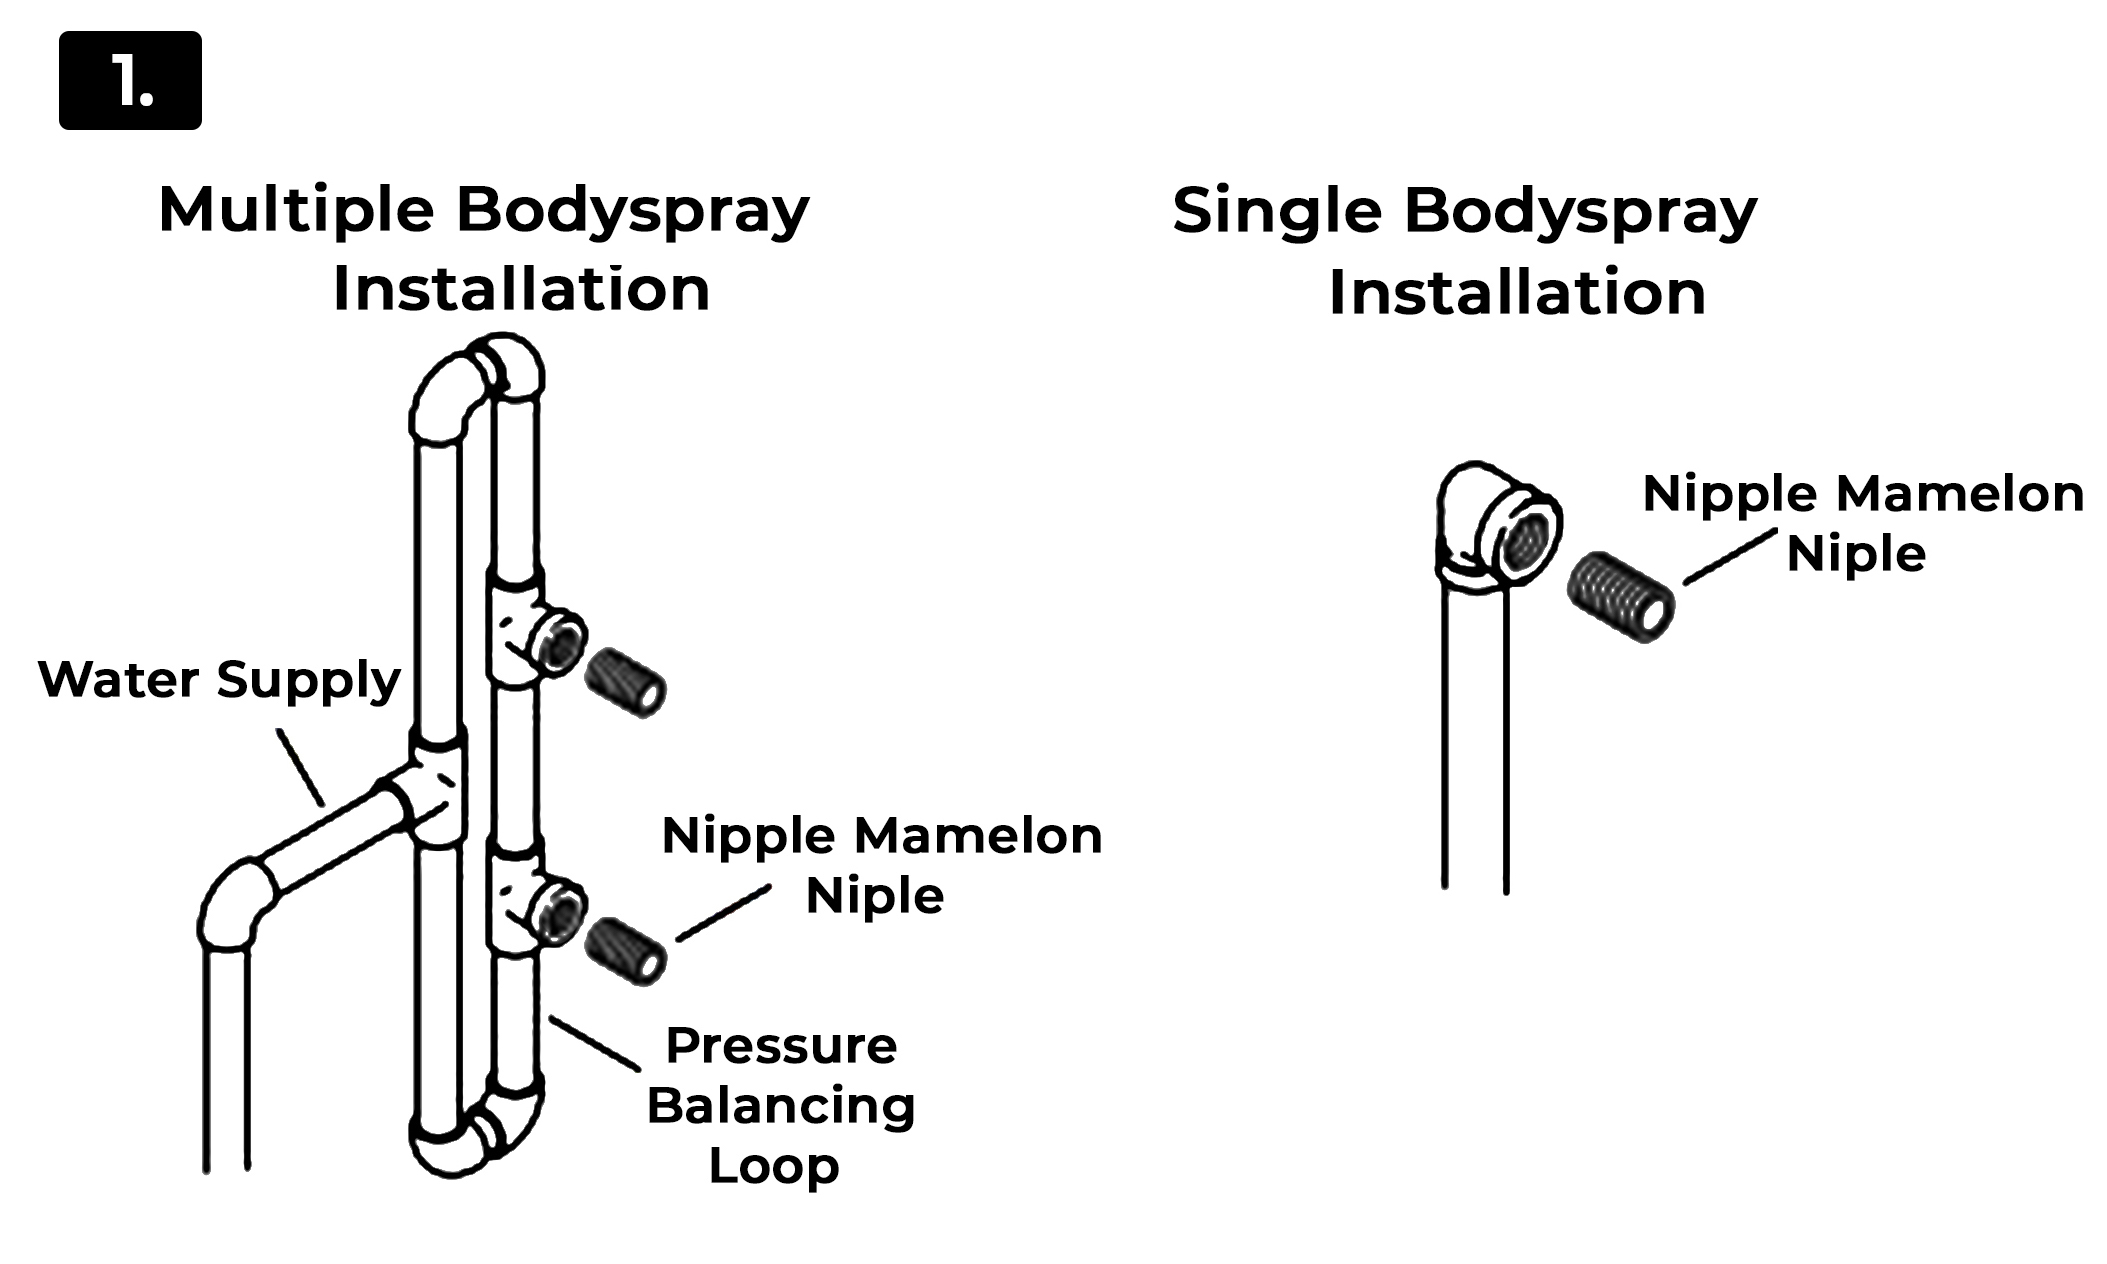
Multiple Bodyspray Installation
Water Supply
Nipple Mamelon Nipple
Pressure Balancing Loop
1. Route the water supply lines.
2. If installing more than one bodyspray off the same supply line, construct a pressure balancing loop. Locate a tee along the loop at each bodyspray installation location.
3. Do not strap the pipes at this time.
Single Bodyspray Installation
Nipple Mamelon Nipple
1. Route the water supply line.
2. Install an elbow to the end of the supply pipe at the bodyspray installation location.
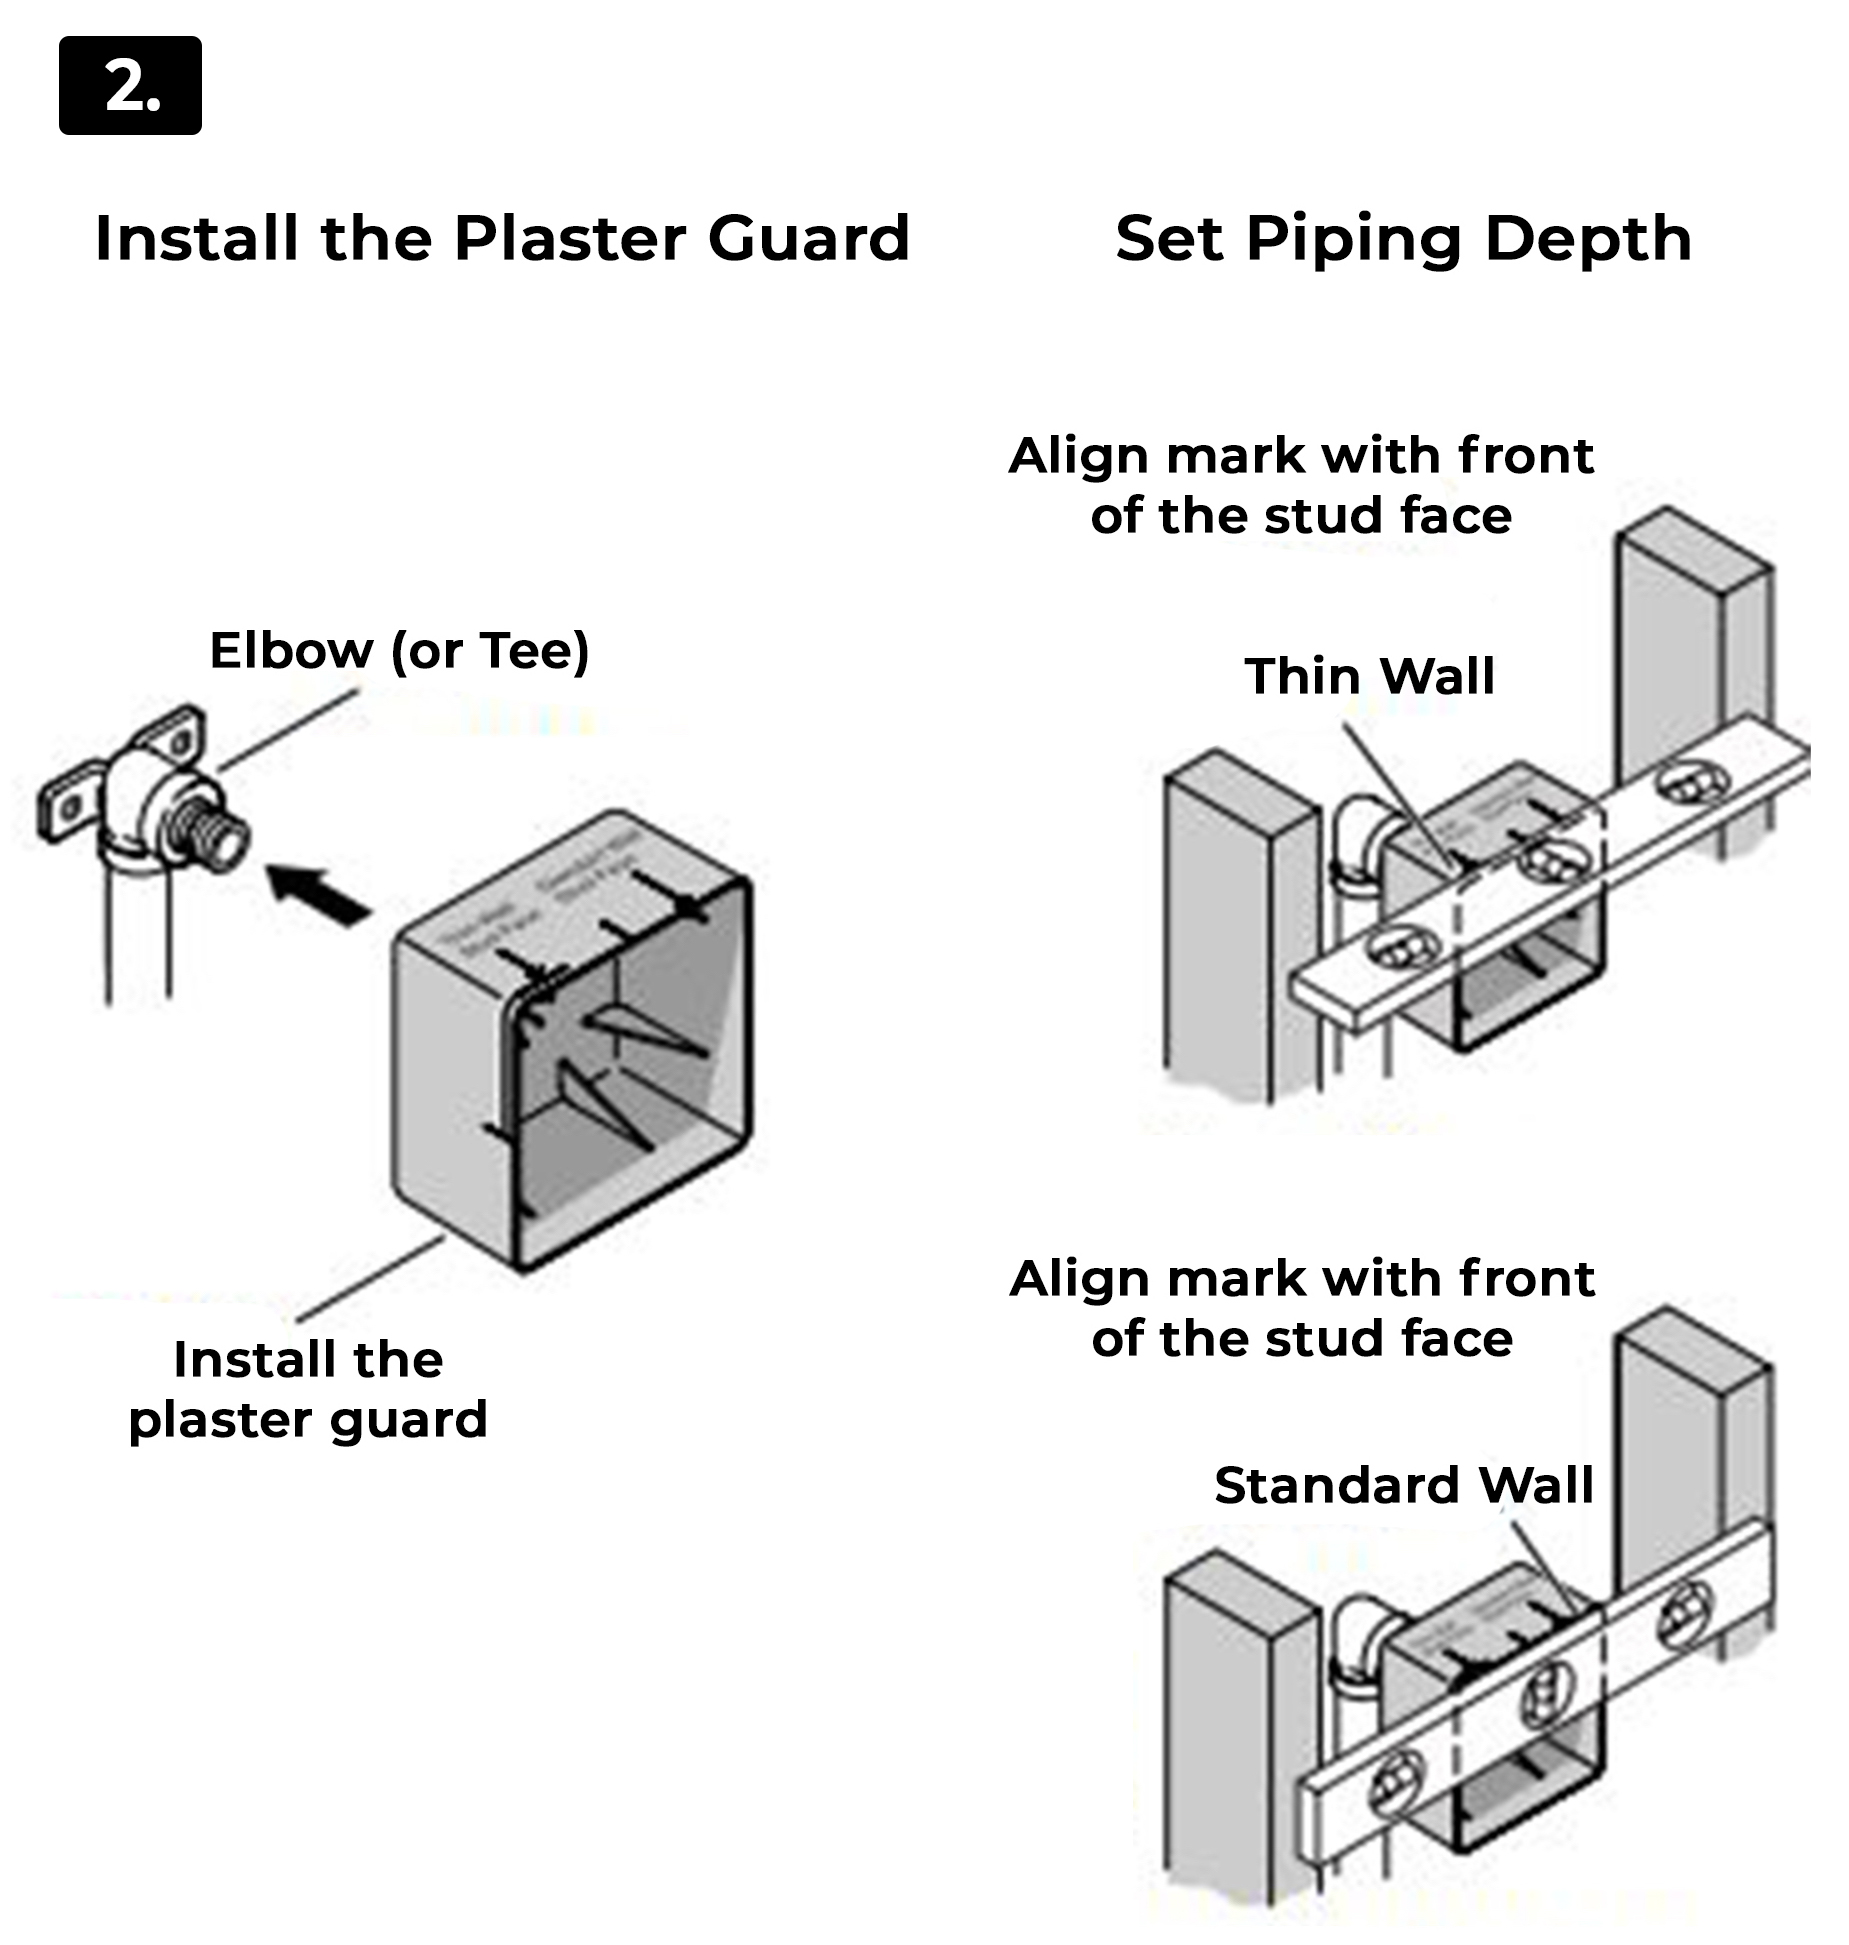 Install the Plaster Guard Install the Plaster Guard
Elbow (or Tee)
Install the plaster guard
Set Piping Depth
Align the mark with the front of the stud face
Thin Wall
Align the mark with the front of the stud face
Standard Wall
Install the plaster guard. Push until the plaster guard is snug against the face of the elbow (or tee).
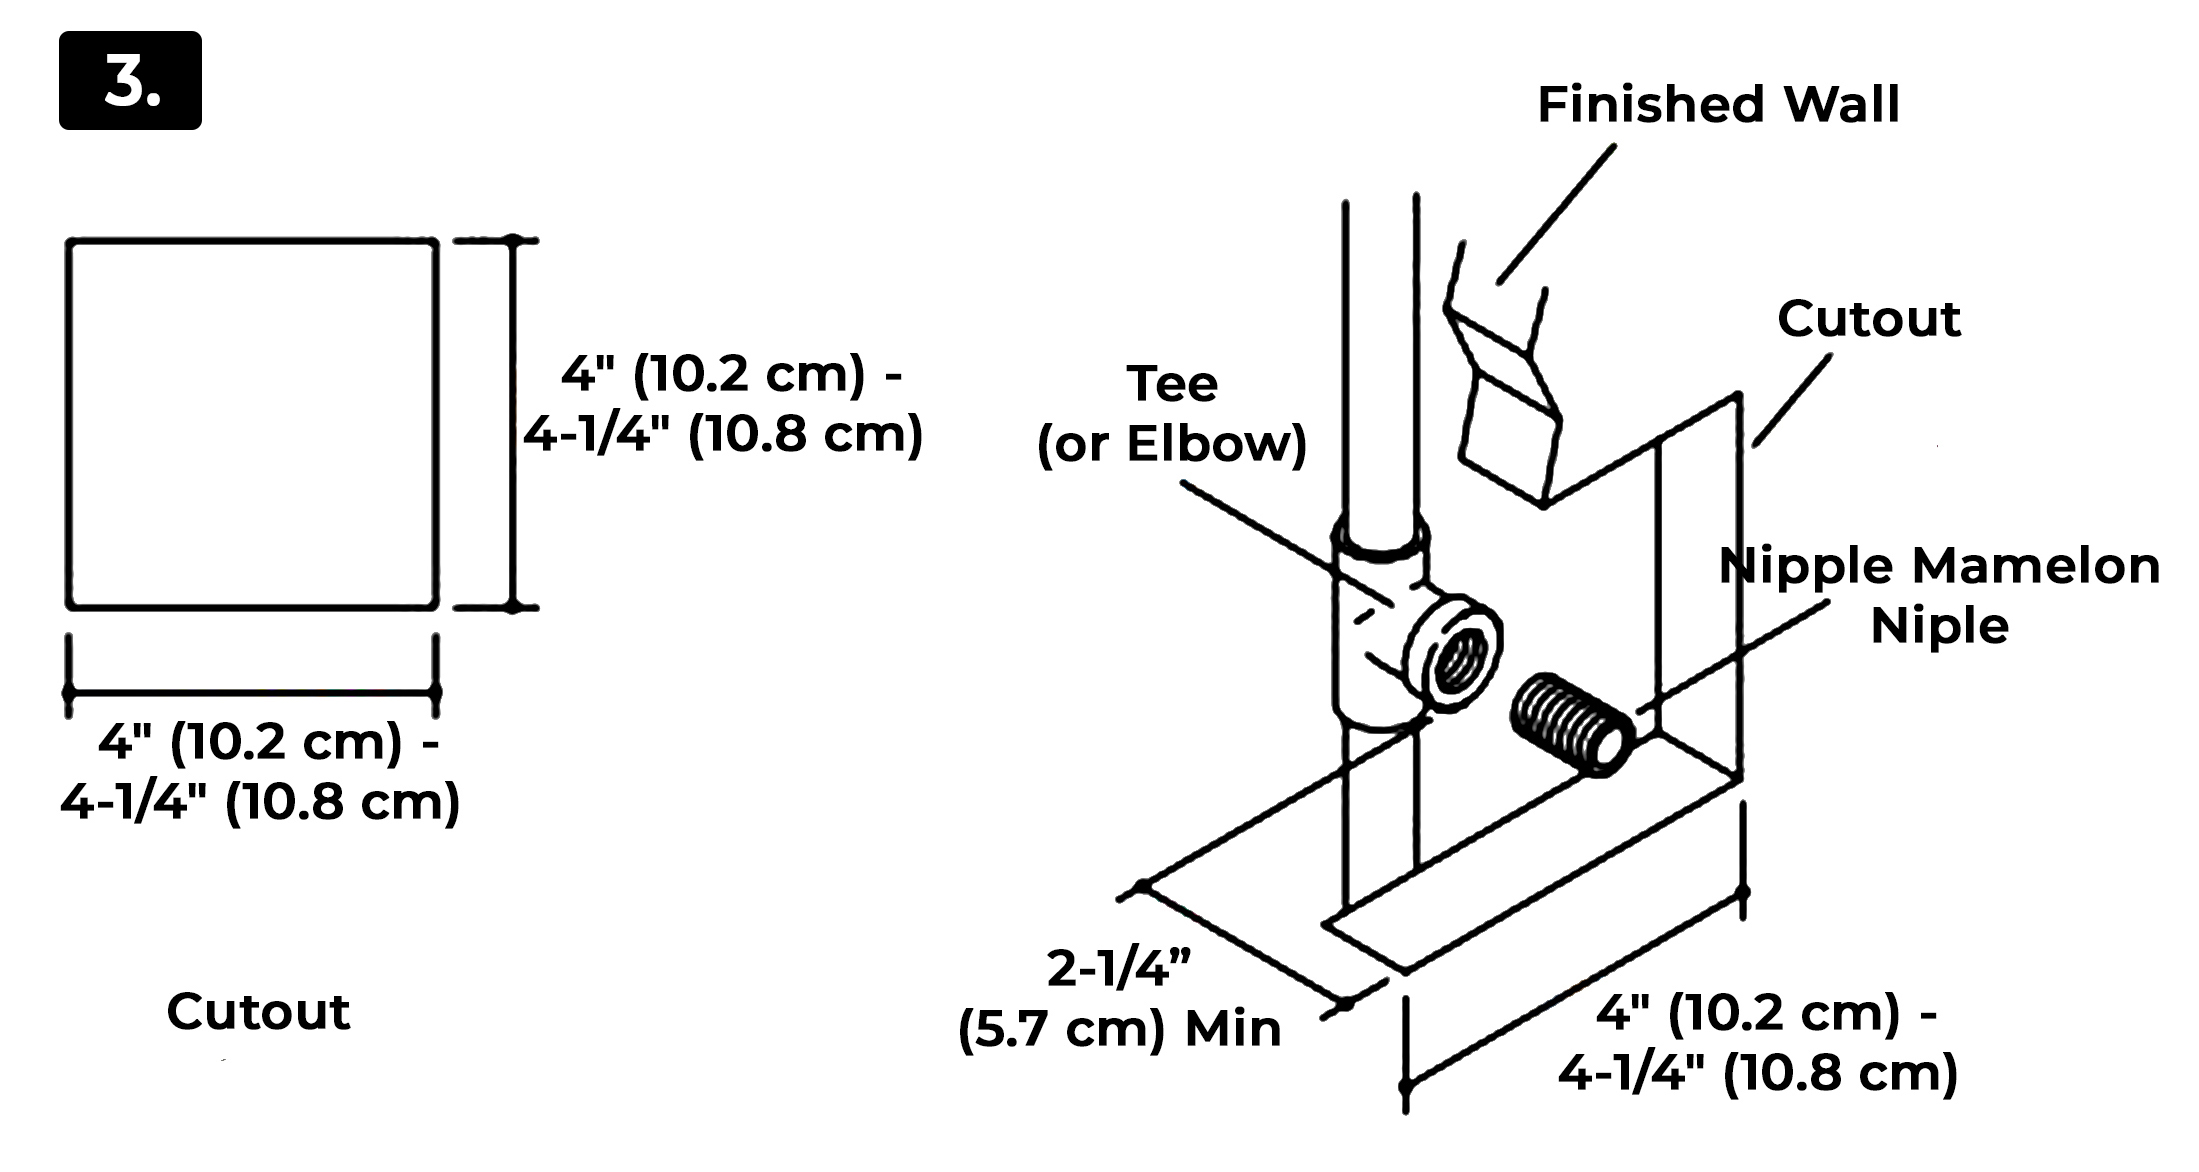 1. Install the water-resistant wall board. 1. Install the water-resistant wall board.
2. Cut out a 4" (10.2 cm) to 4-1/4" (10.8 cm) square at each installation location.
3. Install the finished wall material.
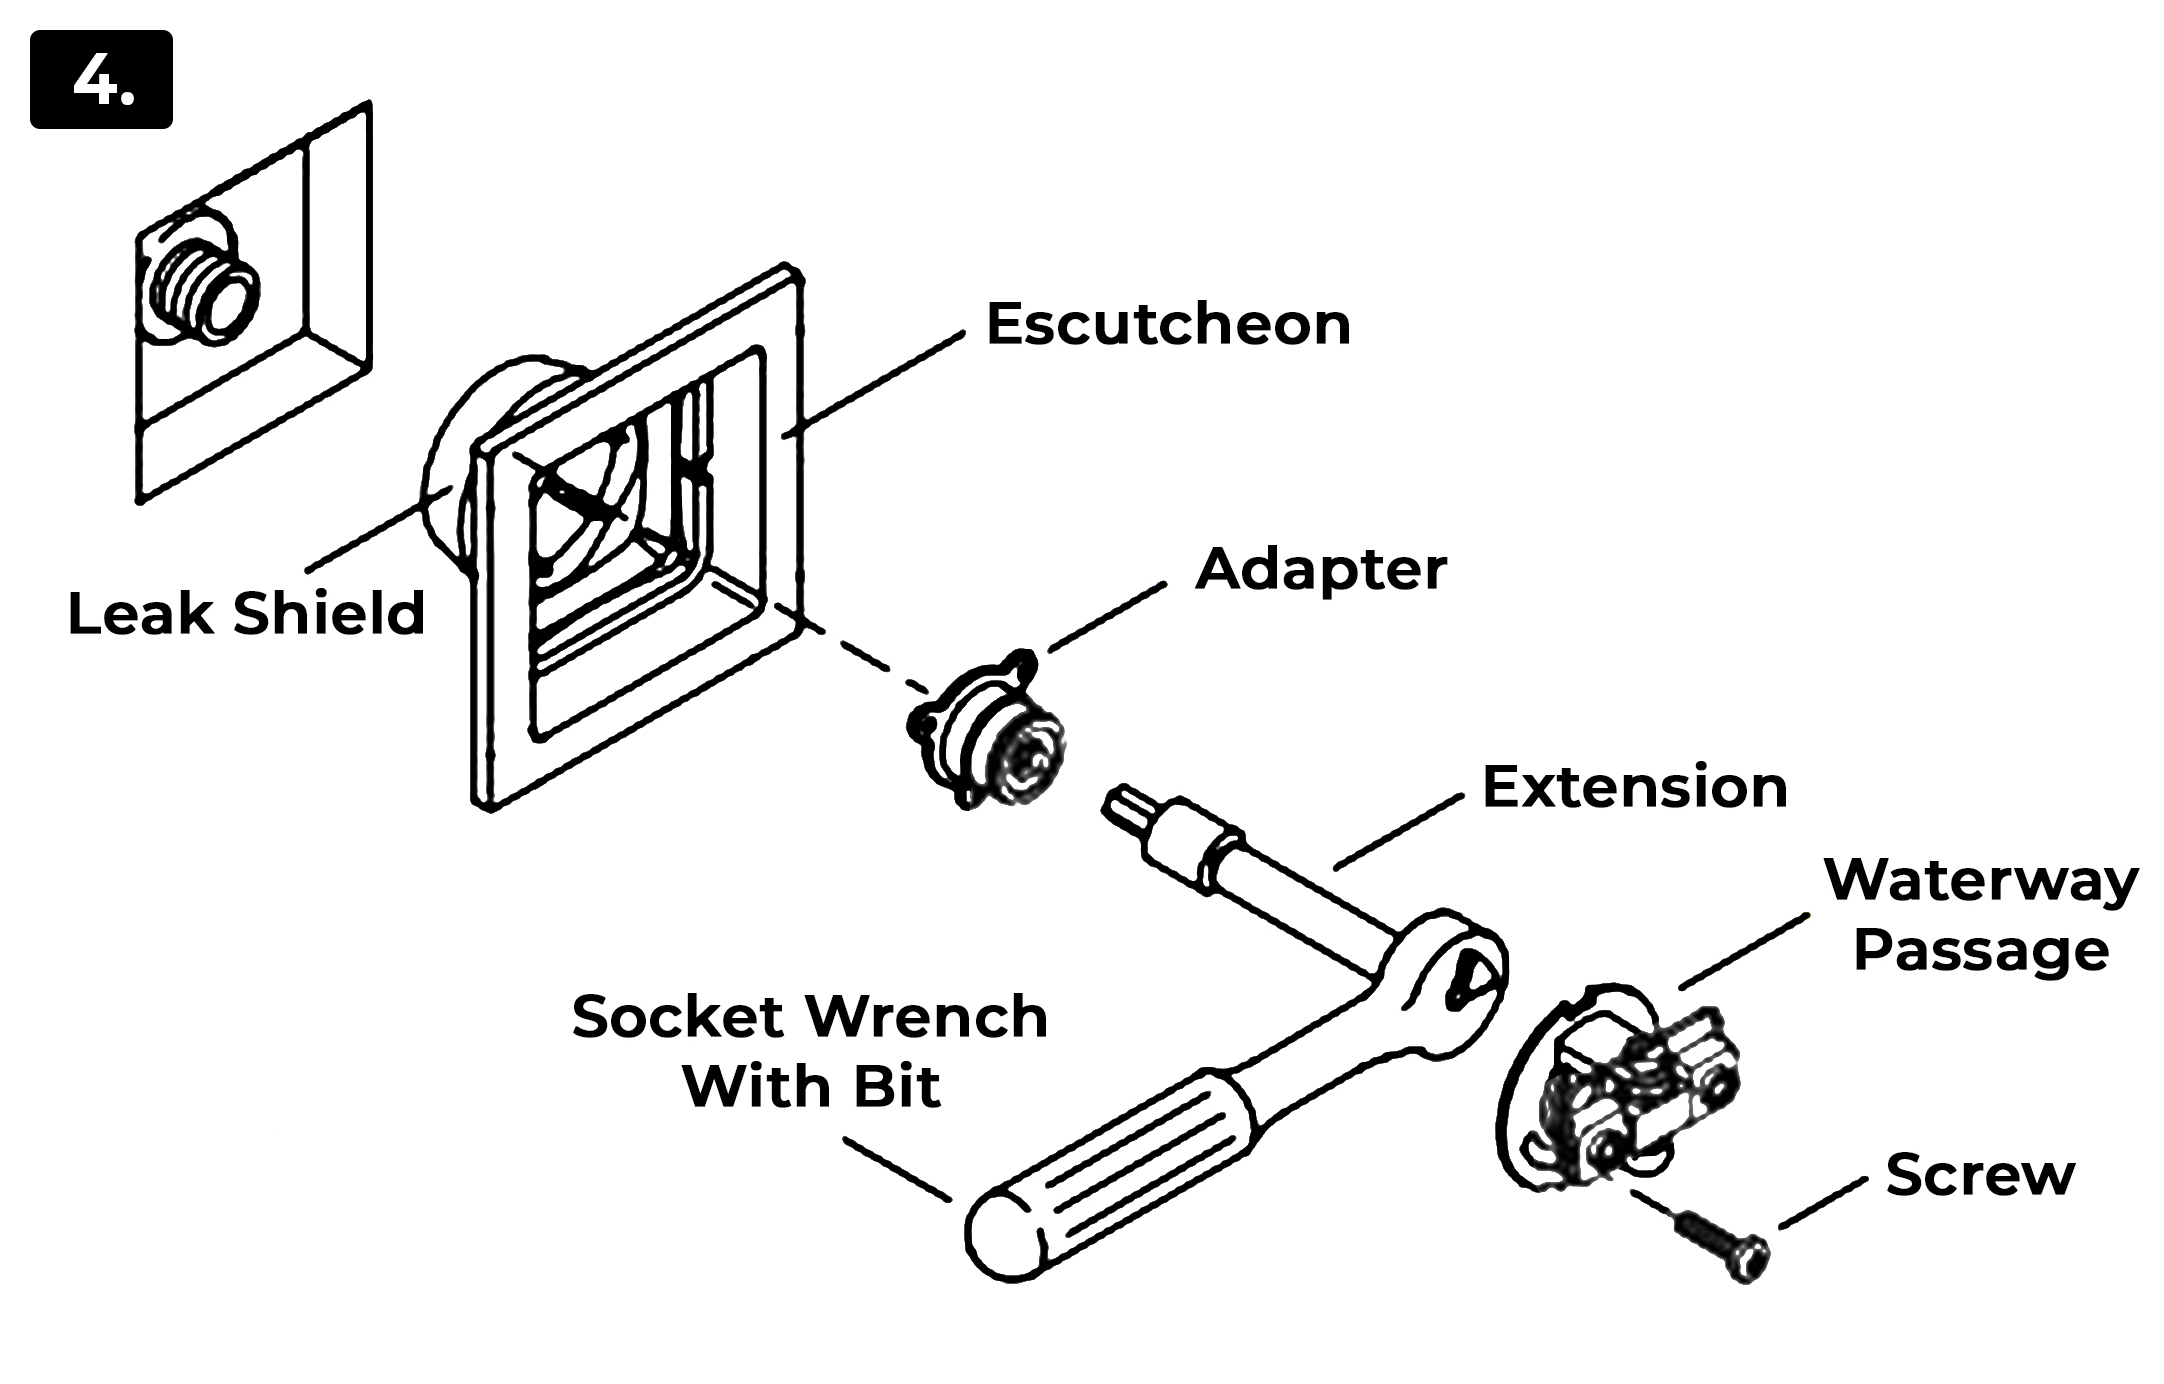 Escutcheon Escutcheon
Leak Shield
Adapter
Extension
Socket Wrench With Bit
Screw
Waterway Passage
1. Insert the escutcheon into the rough opening. The double ribs of the leak shield should be facing up.
2. If the leak shield makes contact with the elbow, Enlarge the hole in the back of the leak shield to 1-1/4" (3.2 cm).
3. Thread the adapter onto the nipple using the provided 11 mm bit, 11 mm, or 7/16" socket, extension, and socket wrench. Use masking tape to hold the bit in place, as the bit could fall off and cause damage.
IMPORTANT! The escutcheon should sit loosely at this point. If it is tight against the wall, use a longer pipe nipple.
4. Align the groove in the waterway with the double ribs on the leak shield.
5. Press the waterway into place over the adapter. Secure the waterway to the adapter with the screw provided.
6. Verify that the escutcheon does not turn or shift.
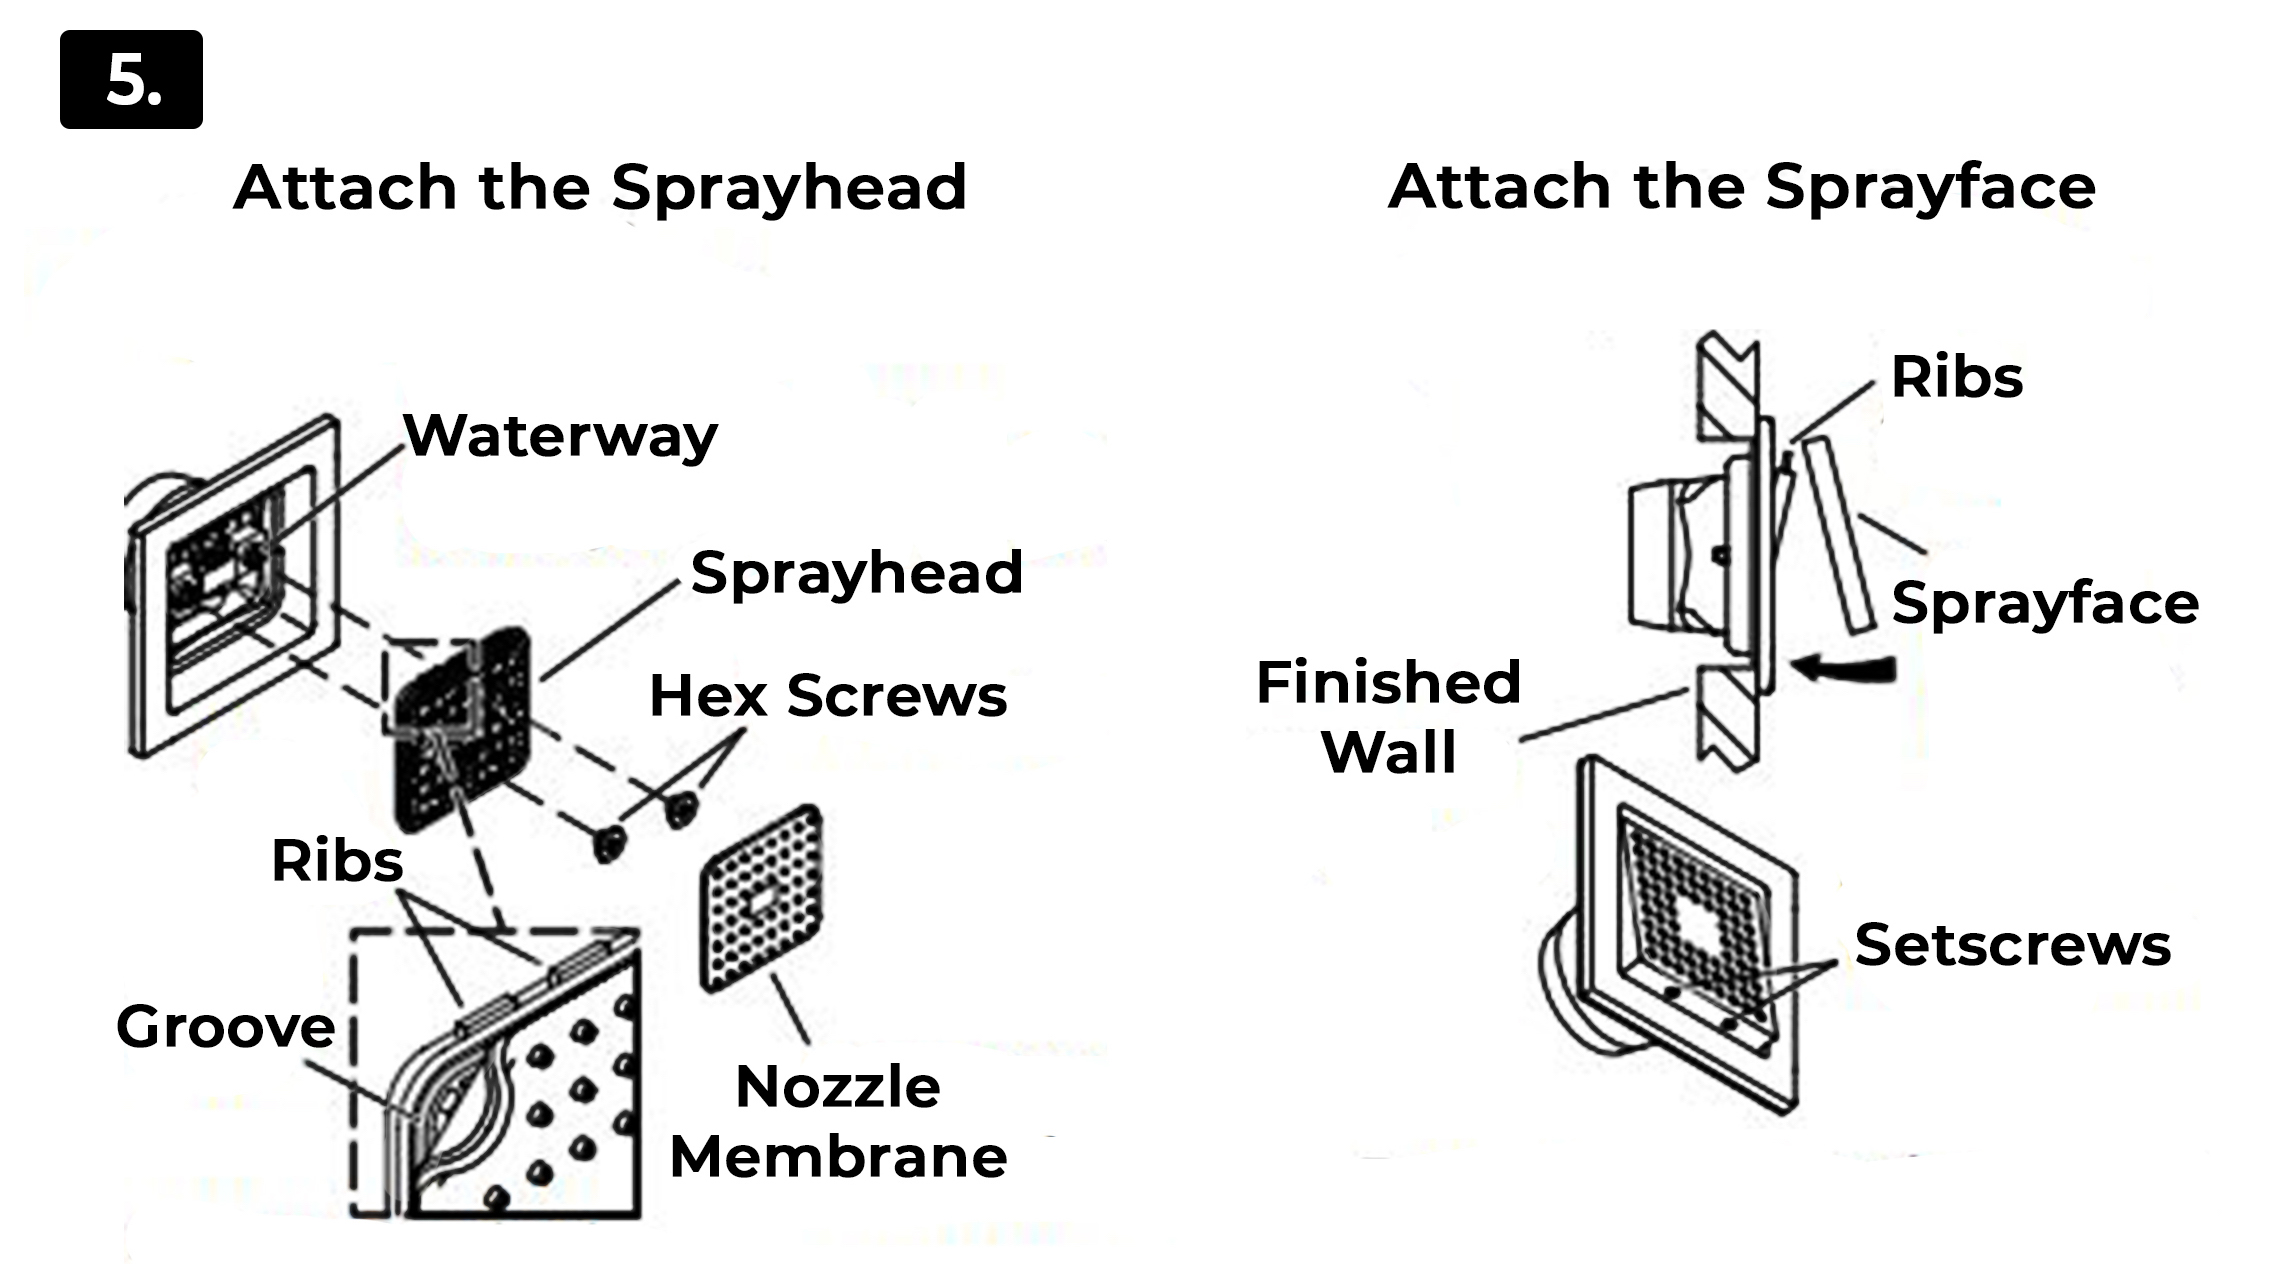 With the ribs of the spray head facing up, install the spray head to the waterway. 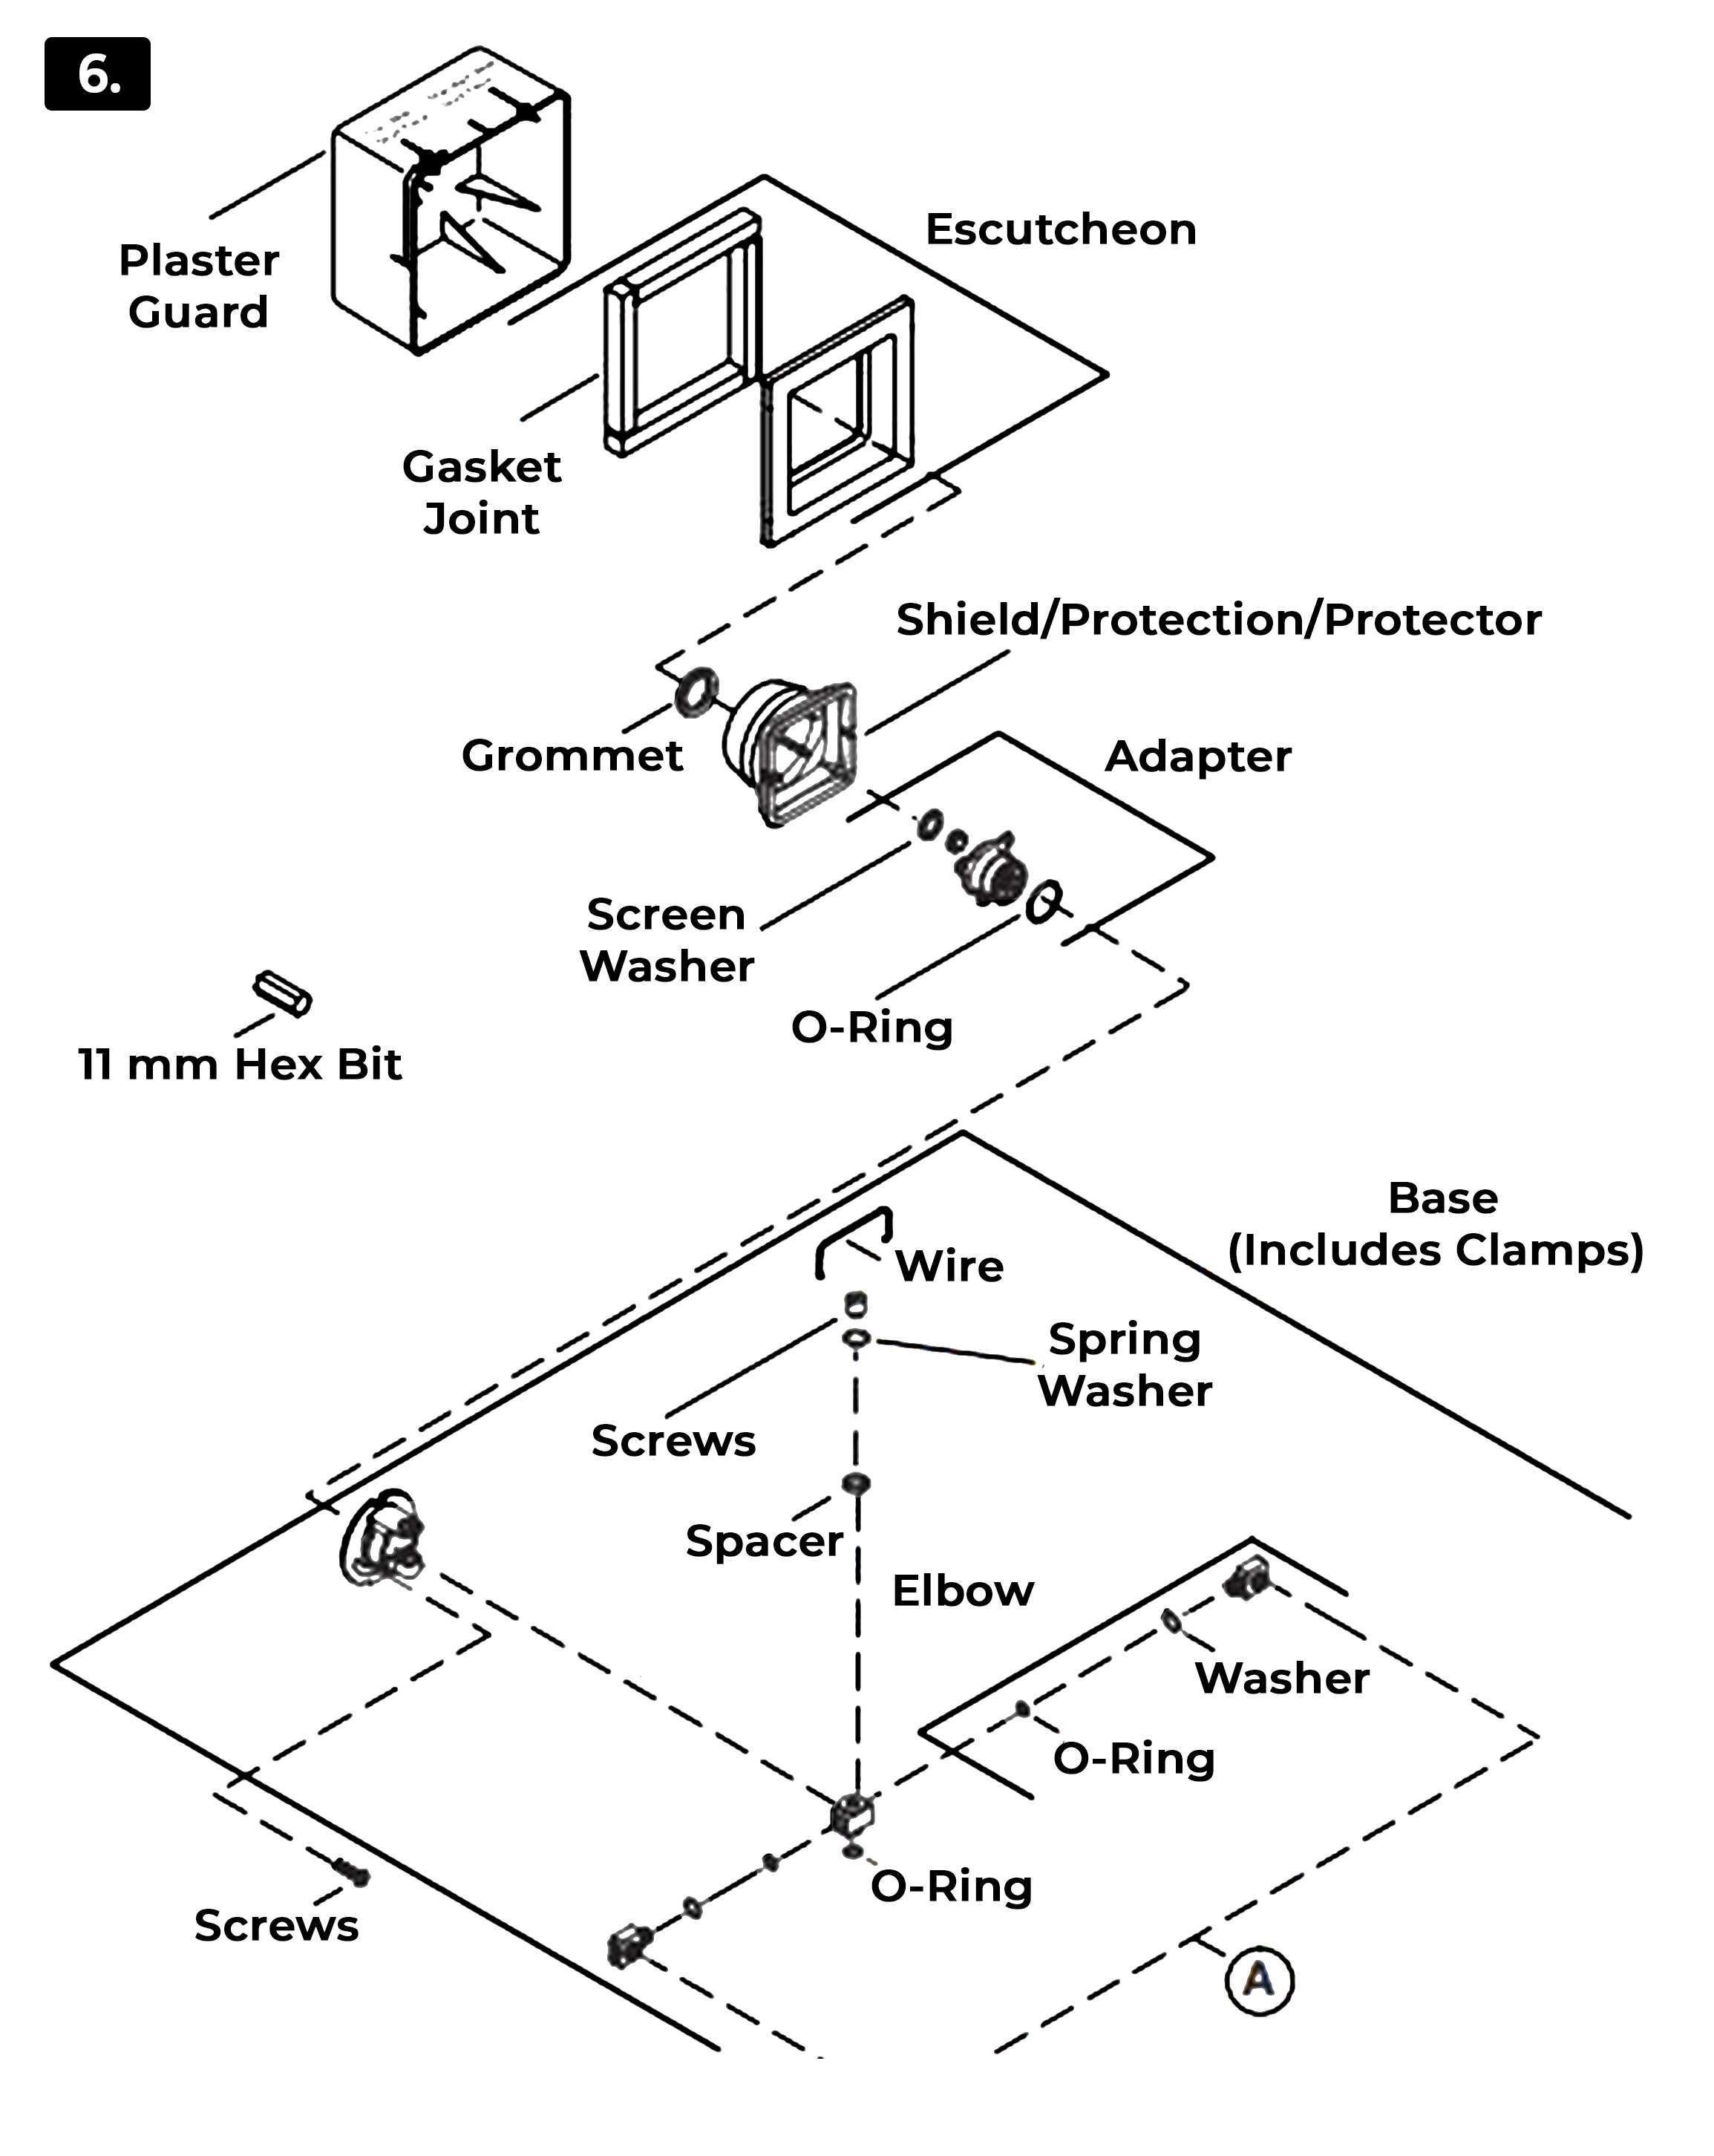 With the ribs of the spray head facing up, install the spray head to the waterway. 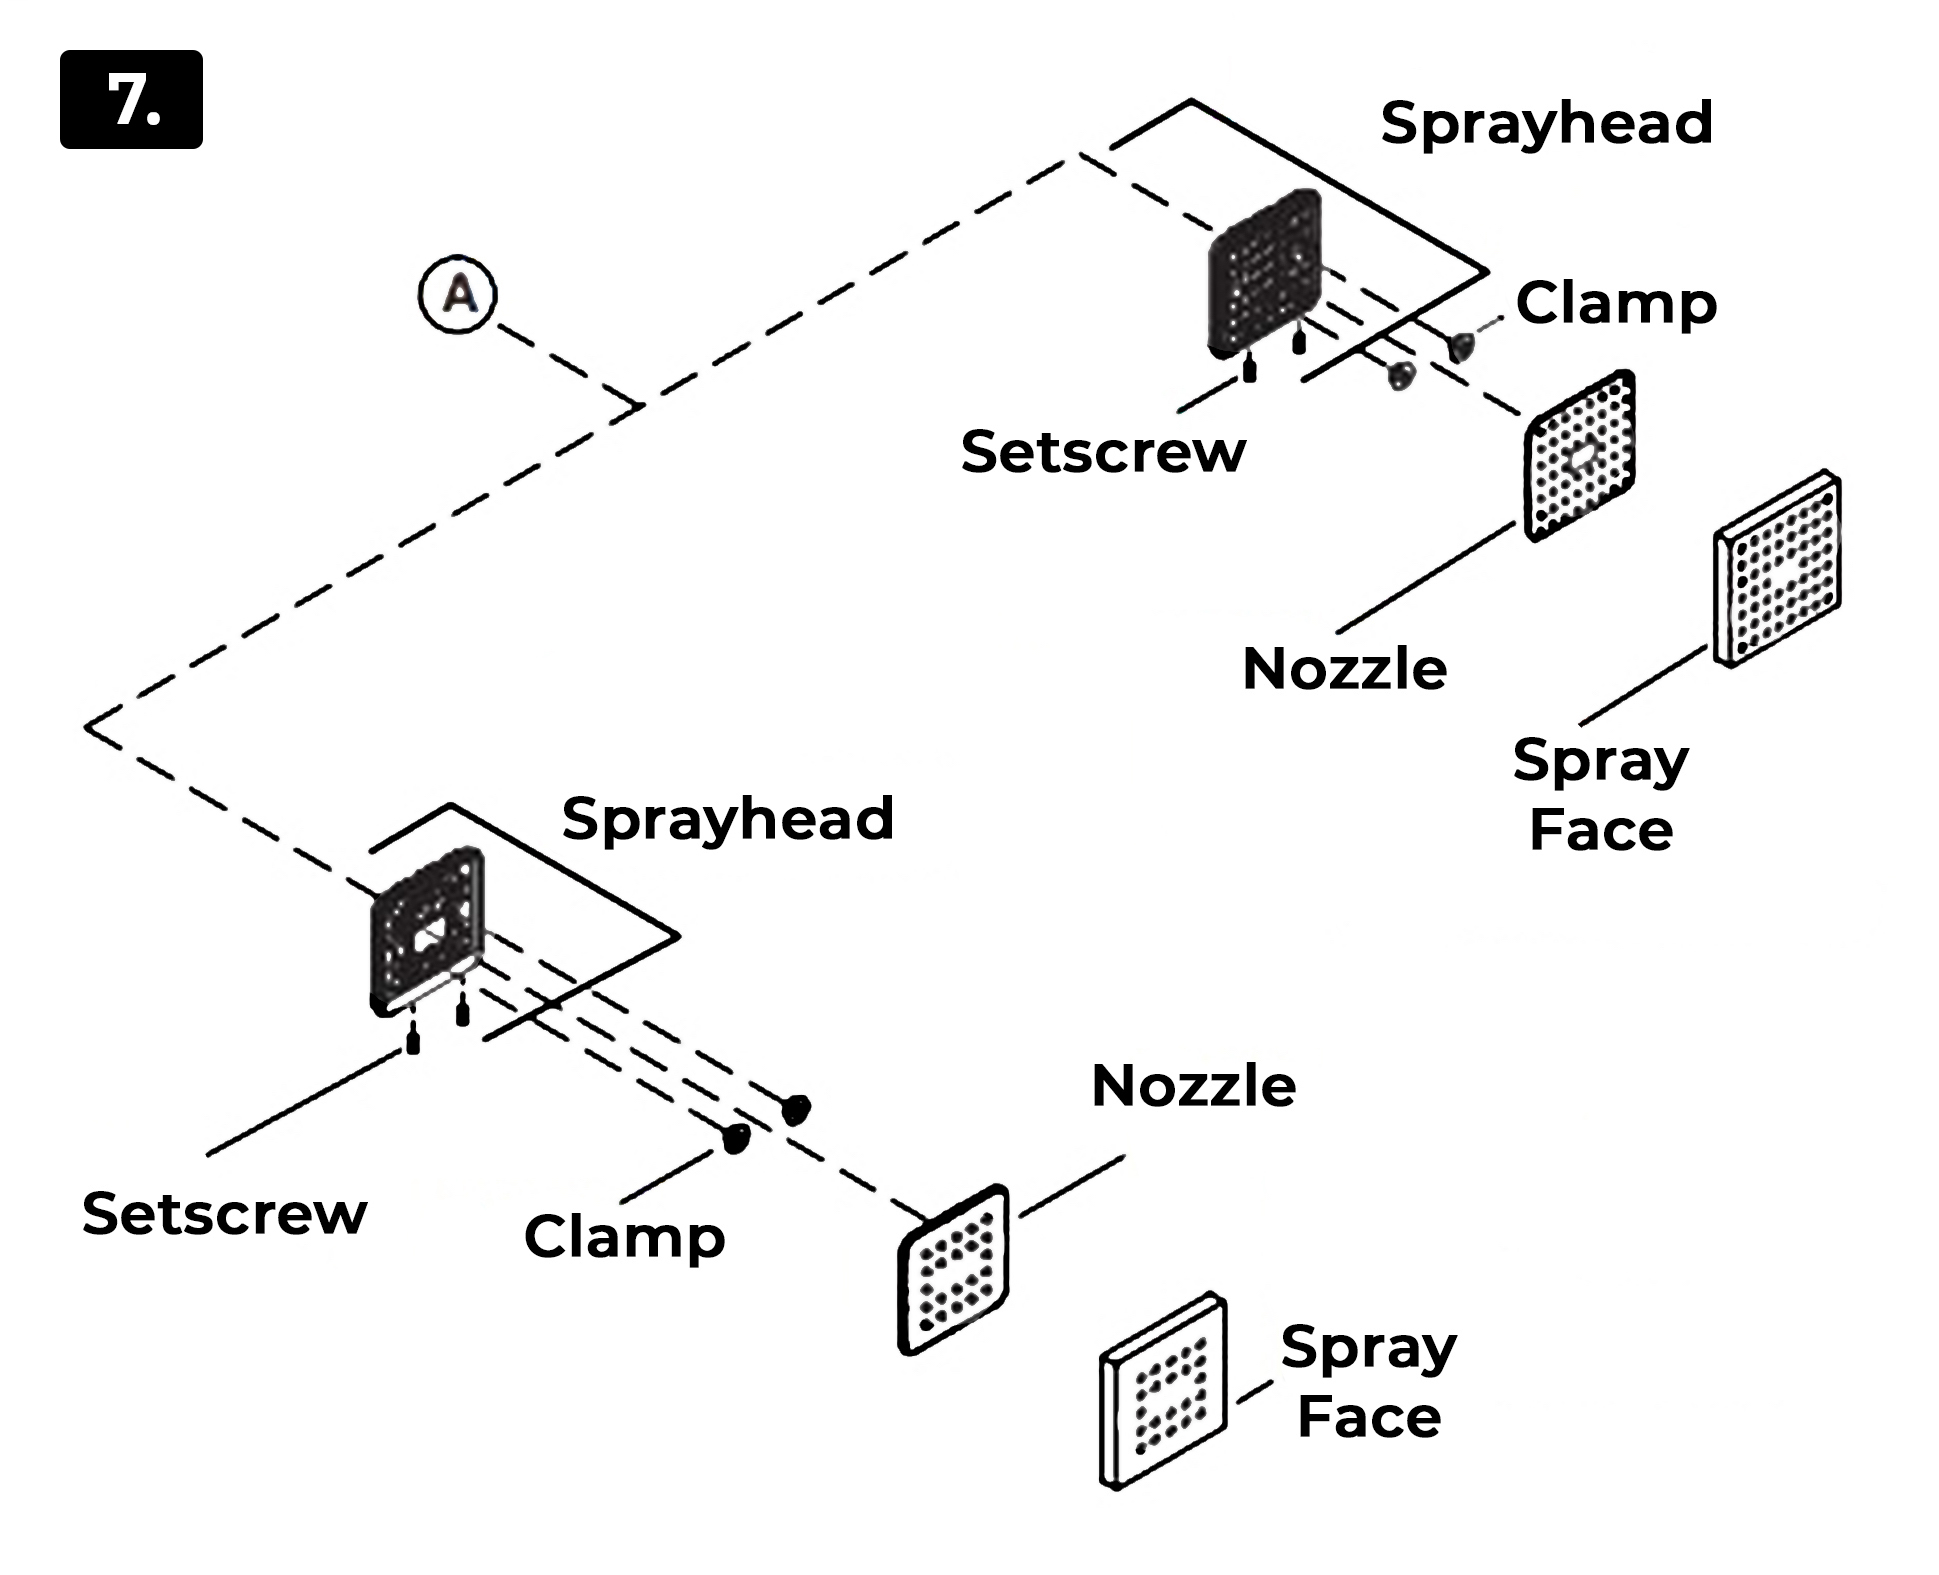 Hand-Held Shower Installation
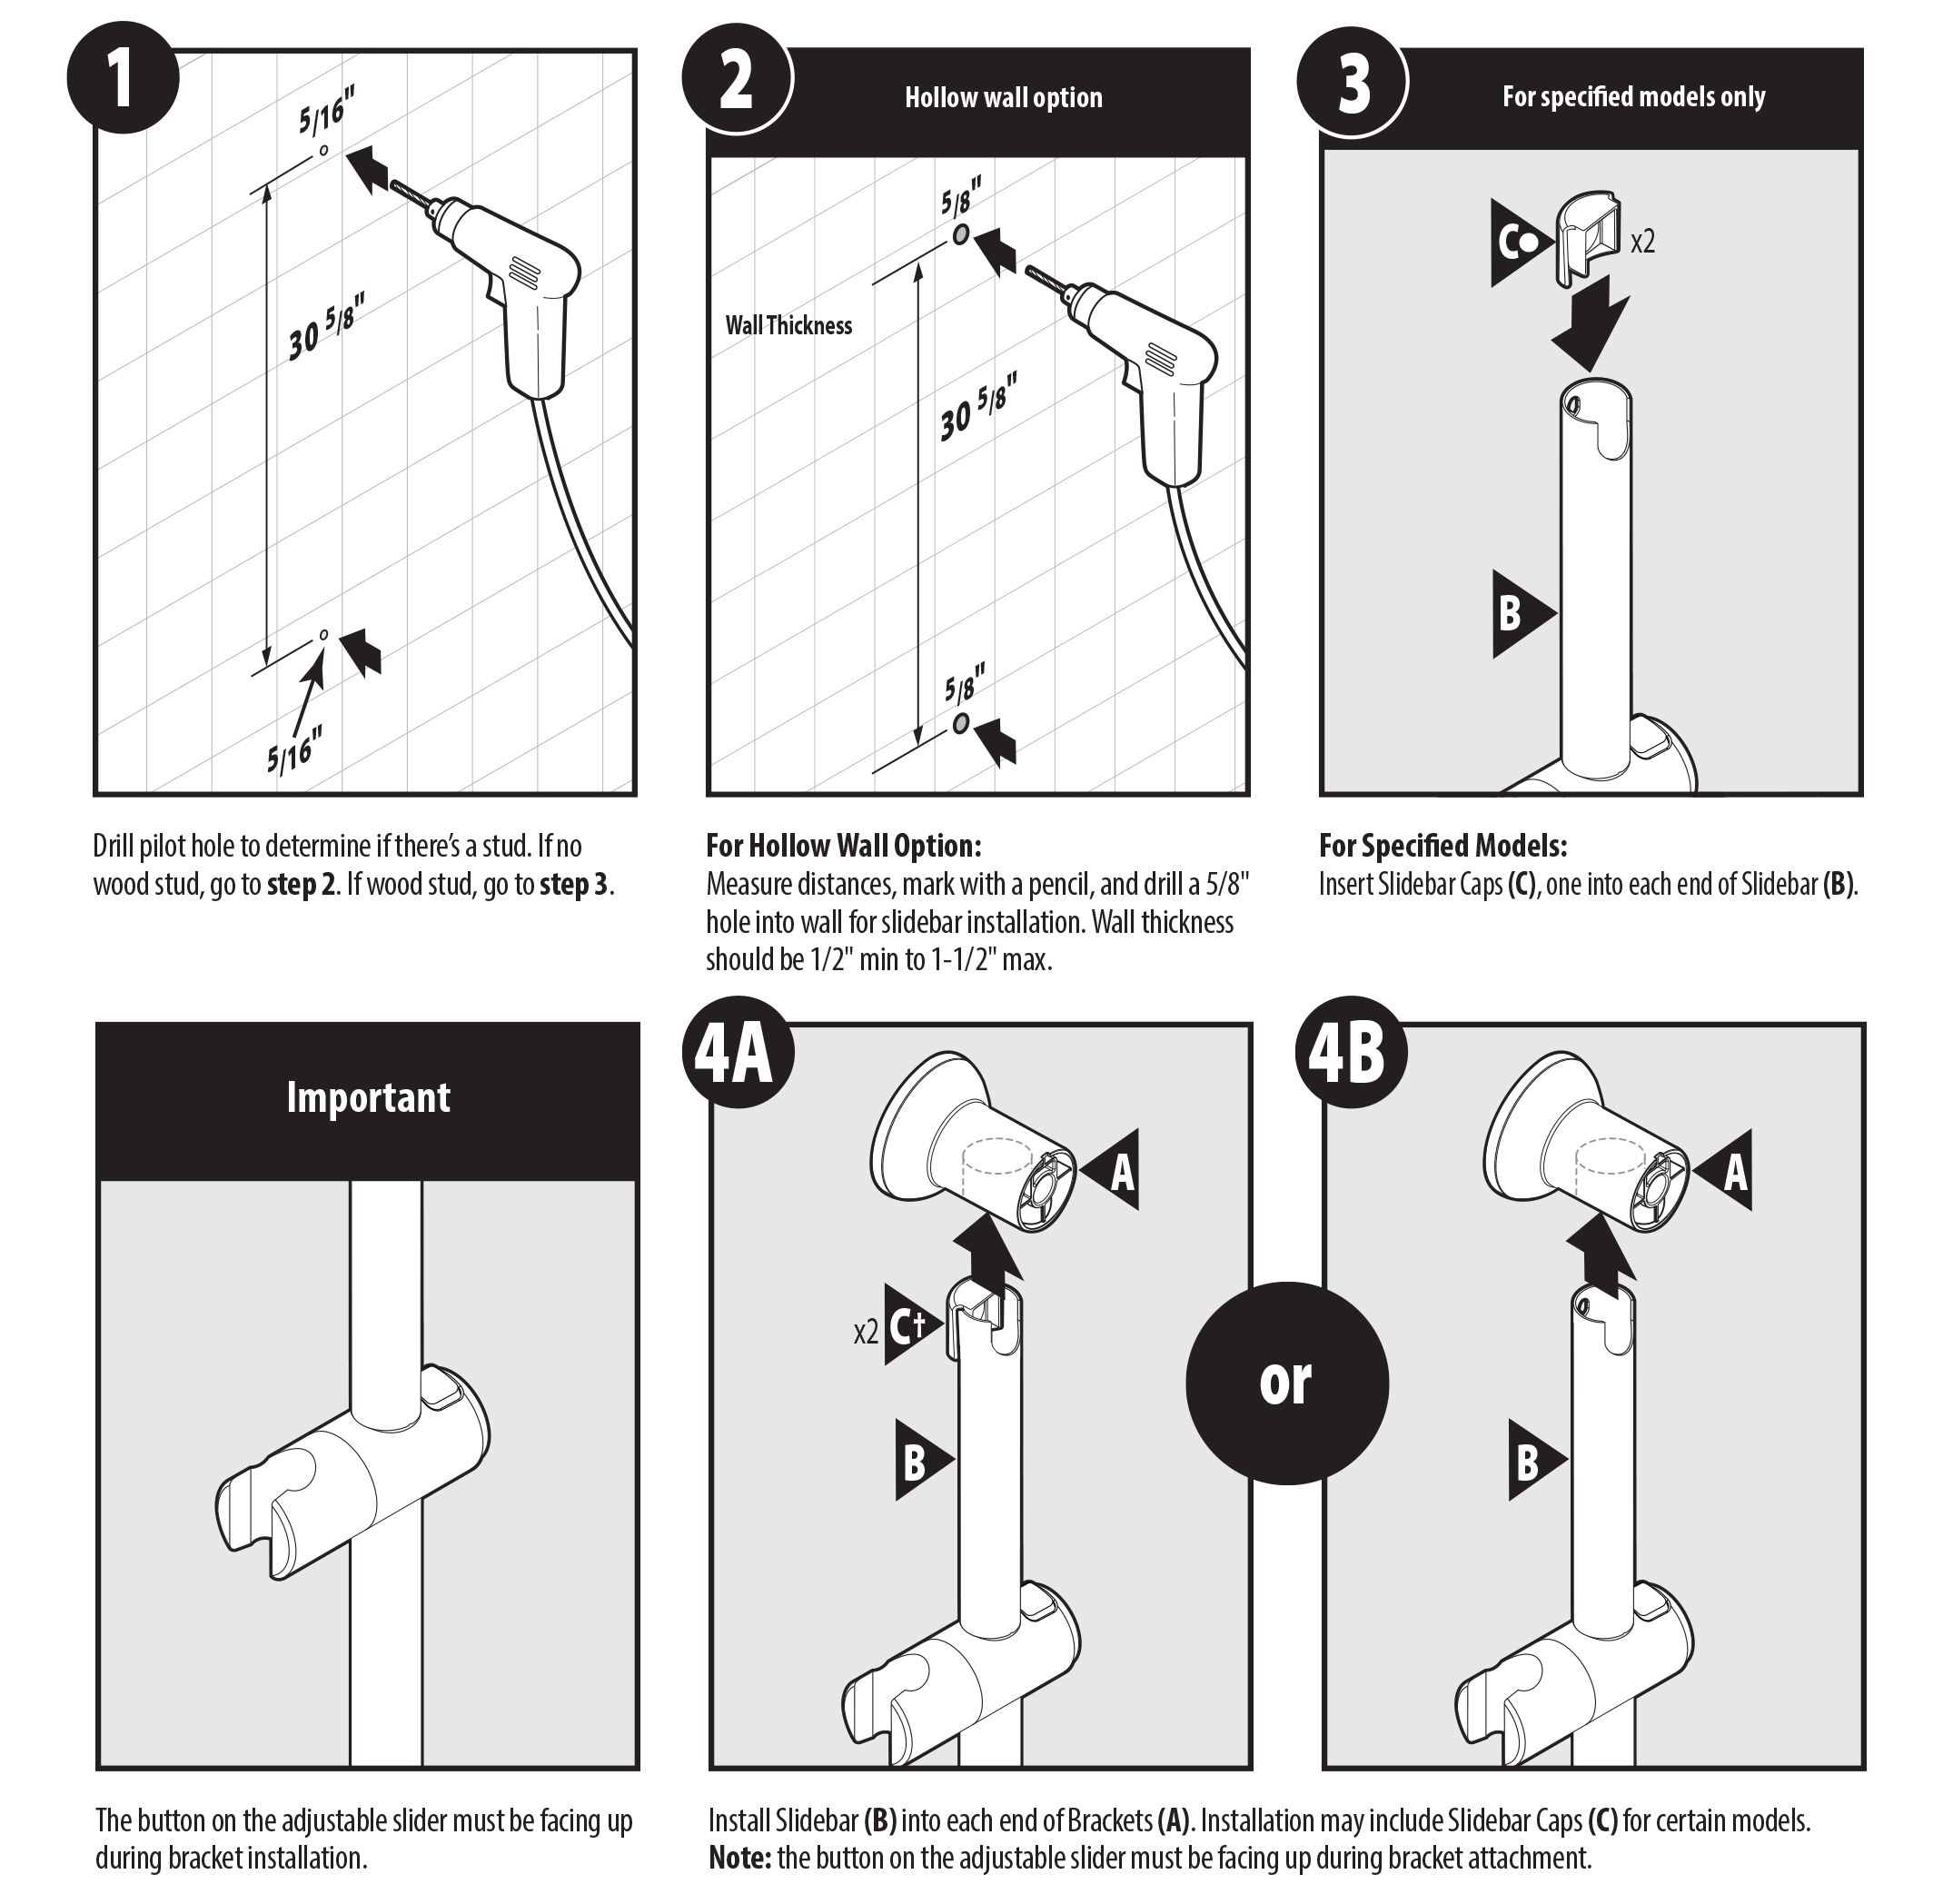 Step 1 - Drill the pilot hole to determine if there's a stud. If there is no wood stud, go to step 2. If wood stud, go to step 3. Step 1 - Drill the pilot hole to determine if there's a stud. If there is no wood stud, go to step 2. If wood stud, go to step 3.
Step 2 - For Hollow Wall Option: Measure distances, mark with a pencil, and drill a 5/8" hole into the wall for sidebar installation. Wall thickness should be 1/2" min to 1-1/2" max.
Step 3 - For Specified Models: Insert Sidebar Caps (C), one into each end of Sidebar (B).
Important - The button on the adjustable slider must be facing up during bracket installation.
Step 4 - Install Sidebar (B) into each end of Brackets (A). Installation may include Sidebar Caps (C) for certain models.
Note: the button on the adjustable slider must be facing up during bracket attachment.
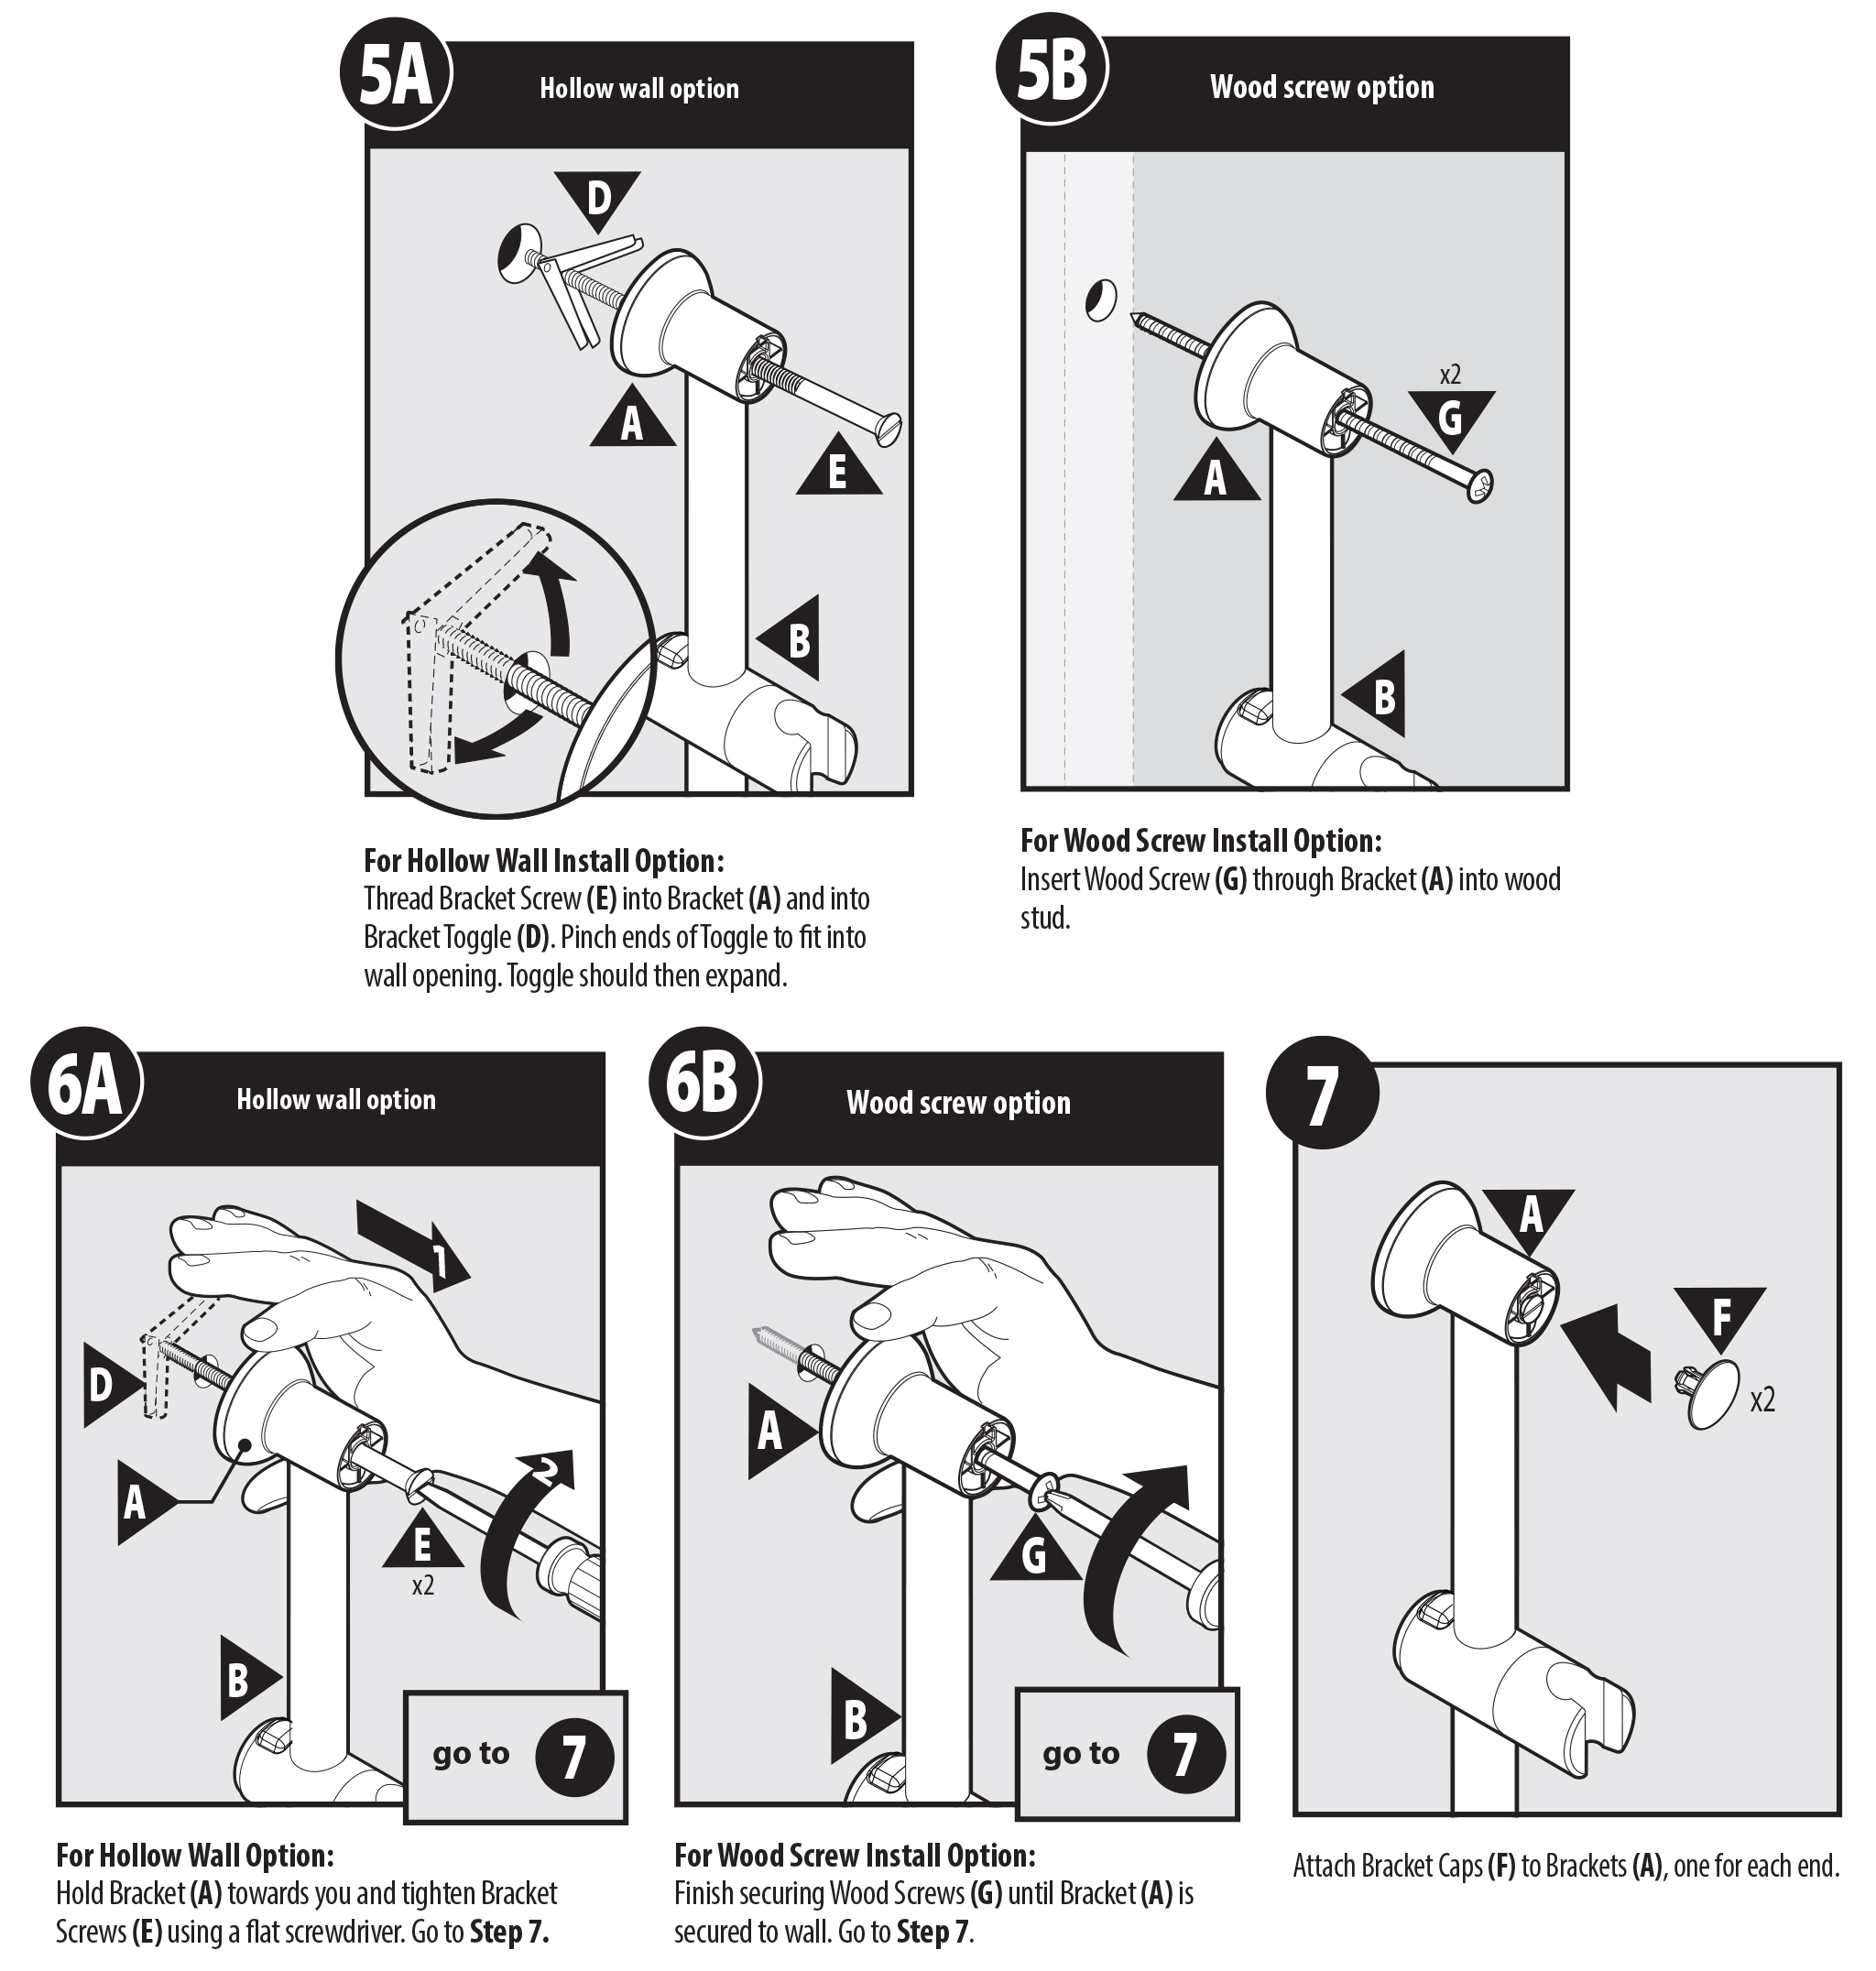
Step 5 - For Hollow Wall Install Option: Thread Bracket Screw (E) into Bracket (A) and into Bracket Toggle (D). Pinch the ends of the Toggle to fit into the wall opening. The toggle should then expand.
Step 5B - For Wood Screw Install Option: Insert Wood Screw (G) through Bracket (A) into the wood stud.
Step 6A - For Hollow Wall Option: Hold Bracket (A) towards you and tighten Bracket Screws (E) using a flat screwdriver. Go to Step 7.
Step 6B - For Wood Screw Install Option: Finish securing Wood Screws (G) until Bracket (A) is secured to the wall. Go to Step 7.
Step 7 - Attach Bracket Caps (F) to Brackets (A), one for each end.
Step 8 -
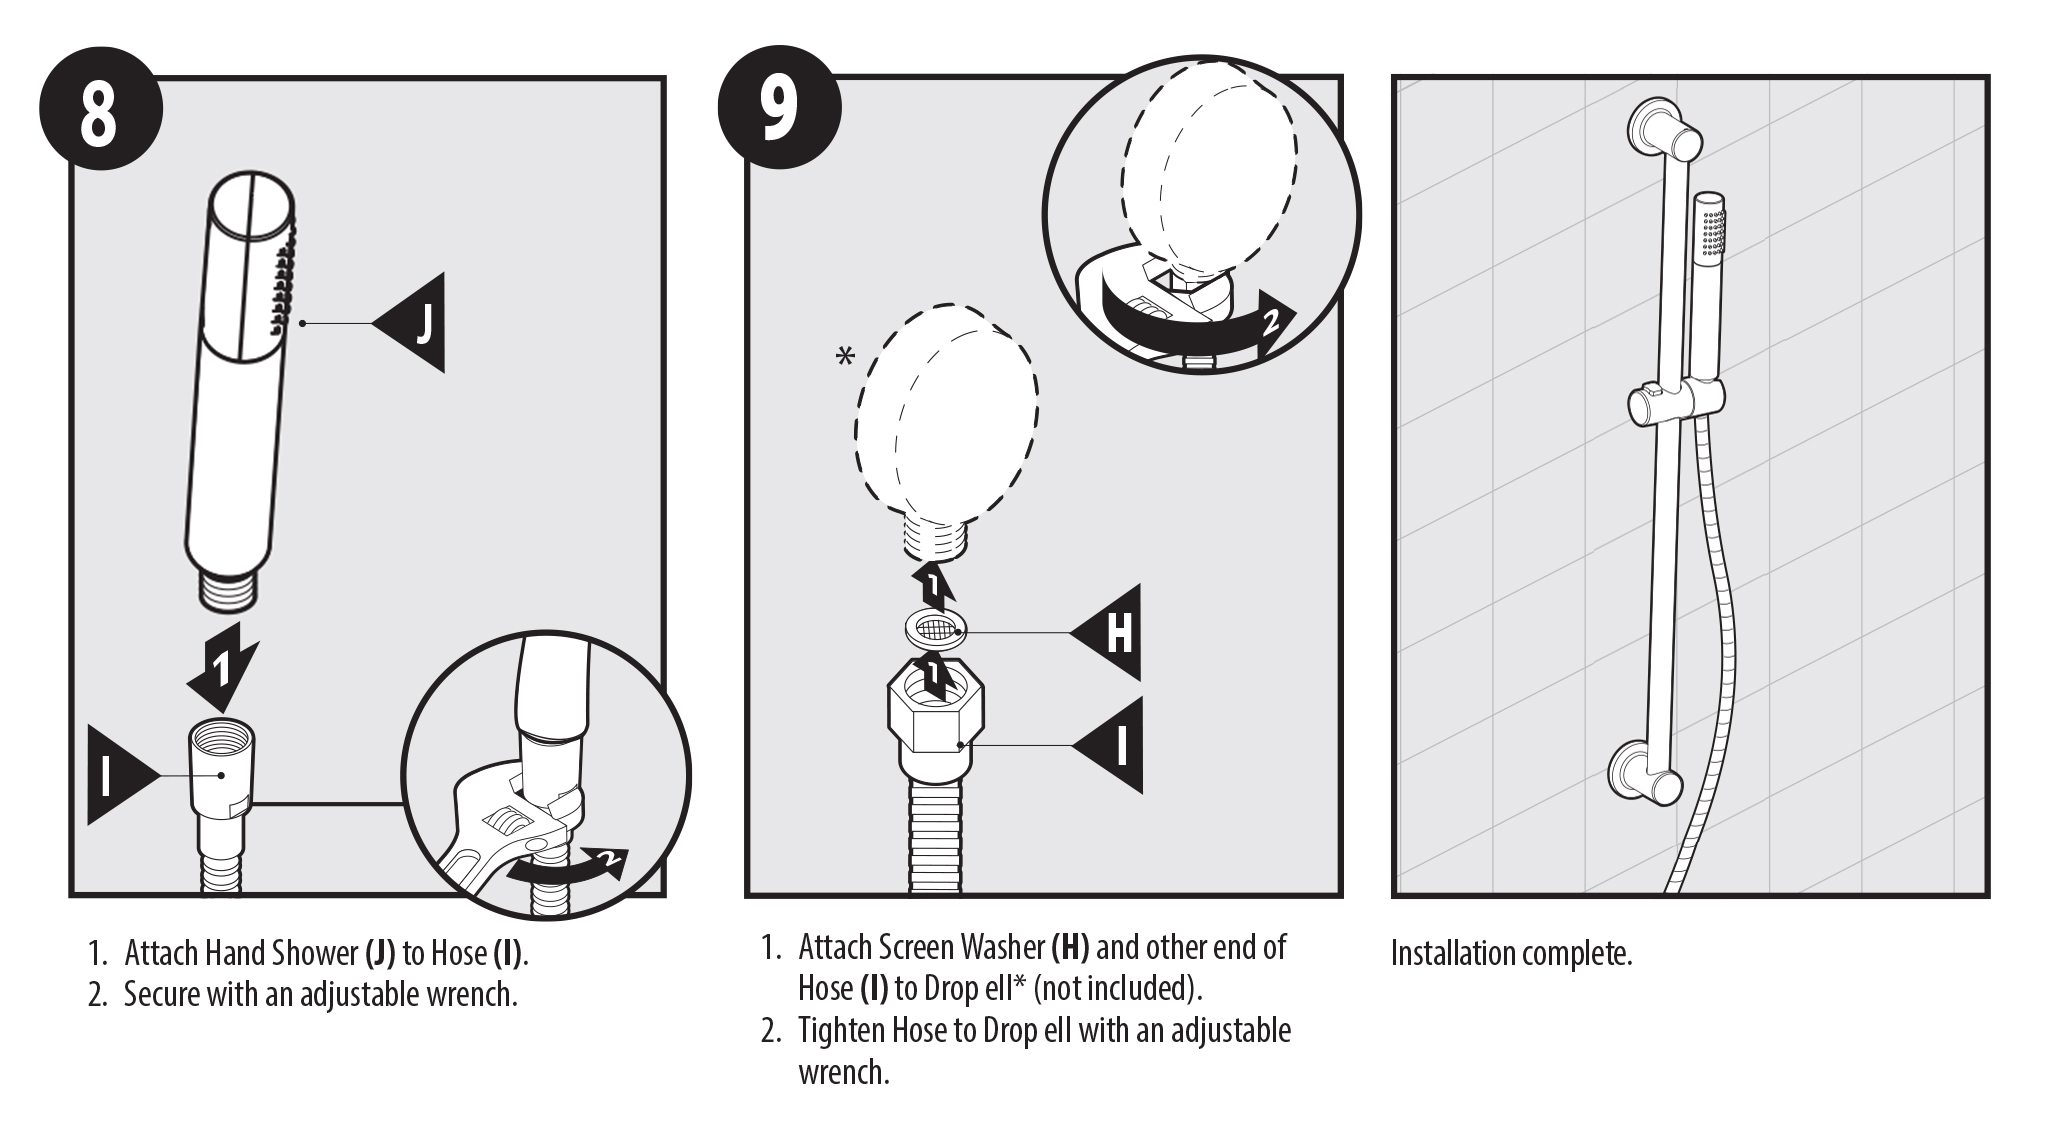
1. Attach Hand Shower (J) to Hose (I).
2. Secure with an adjustable wrench.
Step 9 -
1. Attach Screen Washer (H) and another end of Hose (I) to Drop ell* (not included).
2. Tighten the Hose to Drop all with an adjustable wrench.
Mixer Installation
Installation complete.
|